Integrate with Adobe Commerce (Magento)
impact.com supports a plug-in integration with Adobe Commerce (Magento) e-commerce stores, enabling you to track and send conversions directly to impact.com via our API. Once integrated, you can begin discovering and recruiting partners to drive traffic to your store, create contracts that establish payouts for conversions, access reporting data, and more.
Supported configurations: This integration supports Adobe Commerce versions 2.4.3, 2.4.4, 2.4.5, 2.4.6, and 2.4.7. It does not support multi-store or multi-scope configurations and will only connect with your default store.
Recurring subscriptions are not supported. The Adobe Commerce (Magento) integration does not track recurring subscription orders.
Check before integrating
impact.com will complete several integration steps on your behalf. Check with your implementation engineer to ensure that the following configuration steps have been completed: Event Type, Gateway Tracking, General Tracking.
Install impact.com to Adobe Commerce via Composer
This guide follows the General CLI installation process offered by Adobe Commerce — refer to their documentation for additional information about installing extensions via a CLI.
Install impact.com
impact.com recommends installing the plugin via Composer — it’s easier to install, update, and maintain your installation versus a manual installation.
Using a terminal emulator, navigate to your root Adobe Commerce project directory and update your composer.json file with the following command:
$ composer require impact_tech/module-magento-integrationEnter your authentication keys — your public key is your username; your private key is your password.
Wait for Composer to finish downloading and installing the impact.com plugin.
Updating dependencies (including require-dev)
Package operations: 1 install, 0 updates, 0 removals
- Installing impact_tech/module-magento-integration (X.Y.Z): Downloading (100%)
Writing lock file
Generating autoload filesVerify that the impact.com plugin has been installed properly with the following command:
By default, the impact.com plugin should be installed and disabled.
To enable the impact.com plugin, use the following command to enable and clear any Adobe Commerce-generated static view files:
You should see the following output:
Register the impact.com plugin with the following command:
Recompile your Adobe Commerce project using the following command:
If you’re running Adobe Commerce in Production mode, deploy the module’s static files with the following command:
Verify that the plugin is enabled with the following command:
This command should return Module is enabled.
Finally, flush and clean the cache with the following commands:
Activate & Configure impact.com
The following instruction set shows how to enable the integration using the Adobe Commerce Admin Dashboard.
Activate impact.com
In the left navigation bar of the Adobe Commerce Admin Dashboard, select Settings → Integrations.

On the Integrations screen, find the
ImpactIntegrationline item and select Activate.

Confirm that impact.com can access the necessary files of your store by selecting Allow, then confirm that the integration reads Active under the Status column.

In the left navigation bar of the Adobe Commerce Admin Dashboard, select Stores → Configuration.

Select Impact Settings from the Impact section of the Configurations screen.
Navigate to the bottom of the page to Already have an impact.com account? and select Set up your integration.

Select Existing Customer and fill in all fields with your impact.com account information.

Impact Account SID*
In the impact.com platform, from the top navigation bar, select [User profile] → Settings → API and copy your Account SID.
Auth Token*
In the impact.com platform, from the top navigation bar, select [User profile] → Settings → API and copy your Auth Token.
Program ID*
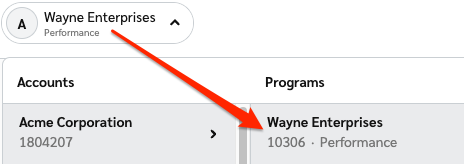
Enter your Program ID value. To find this value, select your brand name in the top-left corner of the impact.com app. Your Program ID is the numerical value under the program name.

Event Type ID*
In the impact.com platform, from the top navigation bar, select [User profile] → Settings → Event Types. Copy the number in parenthesis next to the name of the event type.
Universal Tracking Tag (UTT)*
From the top navigation bar, select [User profile] → Settings → General. Paste your entire unique UTT code into this field.
In the top right corner of the screen, select Save Config.
Once the impact.com app is fully installed, you can begin end-to-end testing to ensure everything is working properly. Learn how to proceed with End-to-End Testing.
Last updated