> For the complete documentation index, see [llms.txt](https://integrations.impact.com/llms.txt). Markdown versions of documentation pages are available by appending `.md` to page URLs; this page is available as [Markdown](https://integrations.impact.com/integration-guides/for-brands/plugin-integrations/e-commerce/integrate-with-woocommerce.md).
# Integrate with WooCommerce
The impact.com plugin on WooCommerce makes it easy to recruit, track, and manage partners that want to promote your online store. Our WooCommerce app is a quick plug-and-play solution to integrating impact.com with your website without needing coding knowledge or extensive developer help. Follow this step-by-step guide to learn about the process and integrate.
{% hint style="warning" %}
**Integrating with WooCommerce currently requires:**
* **One (1) Event Type** tracking online sales (no recurring subscriptions)
* A **store landing page** that is hosted by WooCommerce (not externally)
* **Orders** need to use the standard statuses: completed, pending or processing
{% endhint %}
## Check before integrating
Before proceeding with the WooCommerce integration, ensure you have:
* Access to your impact.com account
* Admin access to your WooCommerce store
* Your impact.com account credentials ready
* WooCommerce version 4.7 or newer (up to version 10)
## Add impact.com to WooCommerce
This instruction set covers installing the [impact.com plugin](https://wordpress.org/plugins/impact-partnership-cloud/) to your WooCommerce store.
### Install impact.com's plugin
1. In your WooCommerce dashboard, expand the left navigation menu and select **Plugins → Add New**.
2. Use the search box in the upper right corner to search for **Impact Partnership Cloud**. Verify you've found the correct plugin (see the screenshot below) and select **Install Now**.
3. After the plugin installs, select **Activate**.
4. Navigate to the *Already have an impact.com account?* section and select **Set up your integration**.
5. Review the access request from impact.com, then select **Approve**.
6. Add your impact.com account information to the fields.
| Field | Description |
| ------------------------- | -------------------------------------------------------------------------------------------------------------------------------------------------------------------------------------------------------------------------------------------------------------------------------------------------------------------------------------------- |
| Impact Account SID \* | In the impact.com platform, navigate to  **\[User profile] → Settings →** [**API**](https://app.impact.com/secure/advertiser/api/fr/api-access-tokens-ui.ihtml) and copy your Account SID. |
| Auth Token \* | In the impact.com platform, navigate to  **\[User profile] → Settings →** [**API**](https://app.impact.com/secure/advertiser/api/fr/api-access-tokens-ui.ihtml) and copy your Auth Token. |
| Program ID \* | In the impact.com platform, select your brand name in the top-left corner. Your Program ID is the numerical value under the program name.
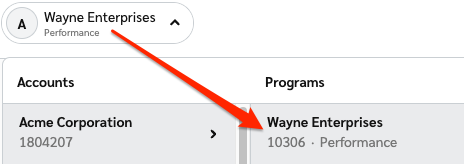
|
| Event Type ID \* | In the impact.com platform, navigate to  **\[User profile] → Settings →** [**Event Types**](https://app.impact.com/secure/advertiser/tracking-settings/actiontracker/view-actiontracker-flow.ihtml). Copy the number in parenthesis next to the name of the event type. |
| Universal Tracking Tag \* | In the impact.com platform, navigate to your [**UTT**](https://app.impact.com/secure/advertiser/fr/general-tracking-settings.ihtml) and copy the entire unique code snippet. |
7. Select **Save**. You'll receive confirmation that impact.com has been installed, after which you can begin end-to-end testing.
## How impact.com tracks conversions
The click ID (`im_ref`) is the identifier that links a partner's referral click to a conversion in impact.com. Understanding how it is captured and stored helps you verify that tracking is working end to end.
### Click ID capture and storage
The click ID (`im_ref`) is the identifier that links a partner's referral click to a conversion in impact.com. When a visitor arrives via a partner tracking link, the UTT reads the `im_ref` value from the URL and writes it into WooCommerce order metadata so it can be included in the conversion payload at checkout.
The click ID is stored in one of the following locations:
* `event.meta_data.irclickid`
* `order.meta_data.irclickid`
### Cookies on the visitor's browser
Alongside capturing the click ID, the UTT sets cookies on the visitor's browser to support attribution, session tracking, and duplicate-click prevention across the shopping journey.
| Cookie name | Purpose | When set | Expiration |
| ----------------- | -------------------------------------------------------------------------------------------------------------------------------------------------------------------------------- | -------------------------------------------------------------------------------------------------------------------------- | ---------- |
| `brwsr` | Unique identifier per browser across all advertisers (assuming profile domain is activated on the campaign). Used to identify the journey for a given consumer. | Upon landing on the site via an impact.com tracking link. Generated server-side on the tracking server. | 365 days |
| `irld` | Last-click cookie used to eliminate duplicate clicks during checkout/conversion. | Upon landing on the site via an impact.com tracking link. | 180 days |
| `irtps` | Third-party cookie that controls the frequency of third-party syncs. Also stores a dummy value when a tag is set to load after a certain time, user, or `source_path` condition. | Upon landing on the site via an impact.com tracking link. | 24 hours |
| `IR_{CampaignID}` | Current session cookie. Activity is updated each time the page loads. | After the UTT initializes upon landing on the site via an impact.com tracking link. Generated client-side through the UTT. | Session |
| `IR_gbd` | Base domain cookie set on the host site. | After the UTT initializes upon landing on the site via an impact.com tracking link. Generated client-side through the UTT. | Session |
| `IR_PI` | Unique identifier per browser for a given advertiser. Used to identify the journey for a given consumer on the advertiser site. | After the UTT initializes upon landing on the site via an impact.com tracking link. Generated client-side through the UTT. | 365 days |
### Conversion payload sent to impact.com
When an order is placed, the plugin captures conversion data and sends it to impact.com via the Conversions API. The tables below document every parameter in the payload and how each is mapped from the WooCommerce order object.
#### Order-level parameters
| impact.com parameter | WooCommerce source | Data type and variations |
| -------------------- | ----------------------------------------------------------------------------------------------- | ------------------------------------ |
| `ActionTrackerId` | Taken from user settings (plugin UI) | String / Numeric |
| `CampaignId` | Taken from user settings (plugin UI) | String / Numeric |
| `im_ref` | `event.meta_data.irclickid` OR `order.meta_data.irclickid` | String |
| `CurrencyCode` | `event.currency` | String (e.g., `USD`, `ZAR`) |
| `CustomerEmail` | `sha1(event.billing.email)` | SHA1-hashed string |
| `CustomerId` | If `event.customer_id === 0` → `null`; else → `event.customer_id` | Null / String / Numeric |
| `CustomerStatus` | If `event.customer_id === 0` → `New`; if `customerOrders.length > 1` → `Existing`; else → `New` | String (`New` \| `Existing`) |
| `EventDate` | `new Date(event.date_created_gmt.split('+')[0]).toISOString()` | ISO 8601 timestamp |
| `IntegrationSource` | Hardcoded value | `Impact_Woocommerce_Plugin` (always) |
| `IpAddress` | `event.meta_data.customer_ip_address` OR `event.customer_ip_address` | String (IPv4 or IPv6) |
| `OrderId` | `event.id` | String / Numeric |
| `OrderPromoCode` | `event.coupon_lines[0].code` | String (first applied coupon only) |
| `UserAgent` | `initParams.meta_data.customer_user_agent` OR `event.customer_user_agent` | String |
#### Item-level parameters
The following parameters are sent once per line item in the order, using an incrementing index (`{i}`).
| impact.com parameter | WooCommerce source / mapping logic | Notes |
| -------------------- | ---------------------------------------------------------- | ---------------------------------------------------- |
| `ItemSku{i}` | `event.line_items[i].sku` | Item SKU or product ID |
| `ItemQuantity{i}` | `event.line_items[i].quantity` | Integer |
| `ItemName{i}` | `event.line_items[i].name` | String |
| `ItemCategory{i}` | `event.line_items[i].name` | String |
| `ItemSubtotal{i}` | `event.line_items[i].subtotal` | Float / Decimal |
| `ItemDiscount{i}` | `event.line_items[i].subtotal - event.line_items[i].total` | Calculated Float / Decimal |
| `ItemPromoCode{i}` | `event.coupon_lines[0].code` | Only sent when a coupon applies to the item. String. |
#### Item promo code behavior
`ItemPromoCode{i}` is only sent when a coupon has been configured in WooCommerce as specific to a product. Excluding a product from a coupon doesn't result in `ItemPromoCode{i}` being sent for that item.
Once the impact.com app is fully installed, you can begin end-to-end testing to ensure everything is working properly. Learn how to proceed with [End-to-End Testing](/integration-guides/end-to-end-tests.md).
## Modifications & Reversals
{% hint style="warning" %}
**Important:** Always make sure to modify and/or reverse orders **in WooCommerce** first, then check that they were modified/reversed in impact.com. Actions you modify or reverse in impact.com **will not be sent** to WooCommerce.
{% endhint %}
Order status syncing between WooCommerce and impact.com is unidirectional, from WooCommerce to impact.com.
The plugin listens for status changes in WooCommerce and automatically sends the corresponding modification or reversal payload to impact.com.
### How automatic handling works
When an order is updated, canceled, or refunded within the WooCommerce dashboard, the plugin captures the status change and sends a modification or reversal payload to impact.com. No manual action is required in impact.com.
### Supported statuses
Orders must use the standard WooCommerce statuses to trigger conversion reporting and reversals. The following statuses are supported:
* `completed` — triggers a conversion.
* `processing` — triggers a conversion.
* `canceled` — triggers a reversal.
Returns and cancellations map to the native WooCommerce refund and cancel states to trigger reversals in impact.com. Non-standard order statuses are not supported and will not trigger conversion reporting or reversals.
## Delete your impact.com integration
1. From your WooCommerce dashboard, select **Impact settings**.
2. From your *Impact settings* page, select **Delete integration** at the bottom of the screen.
3. To confirm the deletion, check the box and select **Delete credentials**.
4. Go to **Plugins** **→** **Installed Plugins** **→** search for **"Impact"** **→** **Deactivate →** **Delete**.
---
# Agent Instructions
This documentation is published with GitBook. GitBook is the documentation platform designed so that both humans and AI agents can read, navigate, and reason over technical content effectively. Learn more at gitbook.com.
## Querying This Documentation
If you need additional information that is not directly available in this page, you can query the documentation dynamically by asking a question.
Perform an HTTP GET request on the current page URL with the `ask` query parameter, and the optional `goal` query parameter:
```
GET https://integrations.impact.com/integration-guides/for-brands/plugin-integrations/e-commerce/integrate-with-woocommerce.md?ask=&goal=
```
`ask` is the immediate question: it should be specific, self-contained, and written in natural language.
`goal` is optional and describes the broader end goal you are ultimately trying to accomplish on behalf of the user. GitBook uses it to tailor the answer towards what is most useful for that goal.
The response will contain a direct answer to the question and relevant excerpts and sources from the documentation.
Use this mechanism when the answer is not explicitly present in the current page, you need clarification or additional context, or you want to retrieve related documentation sections.