> For the complete documentation index, see [llms.txt](https://integrations.impact.com/llms.txt). Markdown versions of documentation pages are available by appending `.md` to page URLs; this page is available as [Markdown](https://integrations.impact.com/integration-guides/for-brands/tracking-integrations/google-tag-manager/implementation.md).
# Implementation
In order to implement the GTM integration, you will have to complete the following:
## Steps to implement
impact.com has three tags you need to load into your GTM container: the Universal Tracking Tag (UTT), Identify Function, and `trackConversion` function. You want the Universal Tracking Tag (UTT) to load first, followed by the Identify Function, then finally fire the `trackConversion` function.
{% stepper %}
{% step %}
### The Universal Tracking Tag
Since the UTT tag must fire first, follow the instructions below to load the impact.com UTT tag into the GTM container.
1. From the *Workspace* dashboard in GTM, select **Tags → New**.
2. Give the tag a name (e.g. Impact UTT), then select **Tag Configuration**.
3. Under the *Choose tag type* section, select **Custom HTML**.
4. Copy the impact.com [Universal Tracking Tag](https://help.impact.com/brand/what-would-you-like-to-learn-about/platform-features/t\[%E2%80%A6]ascript-tag-tracking/tracking-with-universal-tracking-tag-utt) script from your impact.com account(or your technical integration plan) and paste it into the empty *HTML* field.
5. Before the closing `` tag, add the following line: `dataLayer.push({'event':'UttLoaded'});` We will get to what this function does shortly. Your final impact.com UTT script should look similar to this:
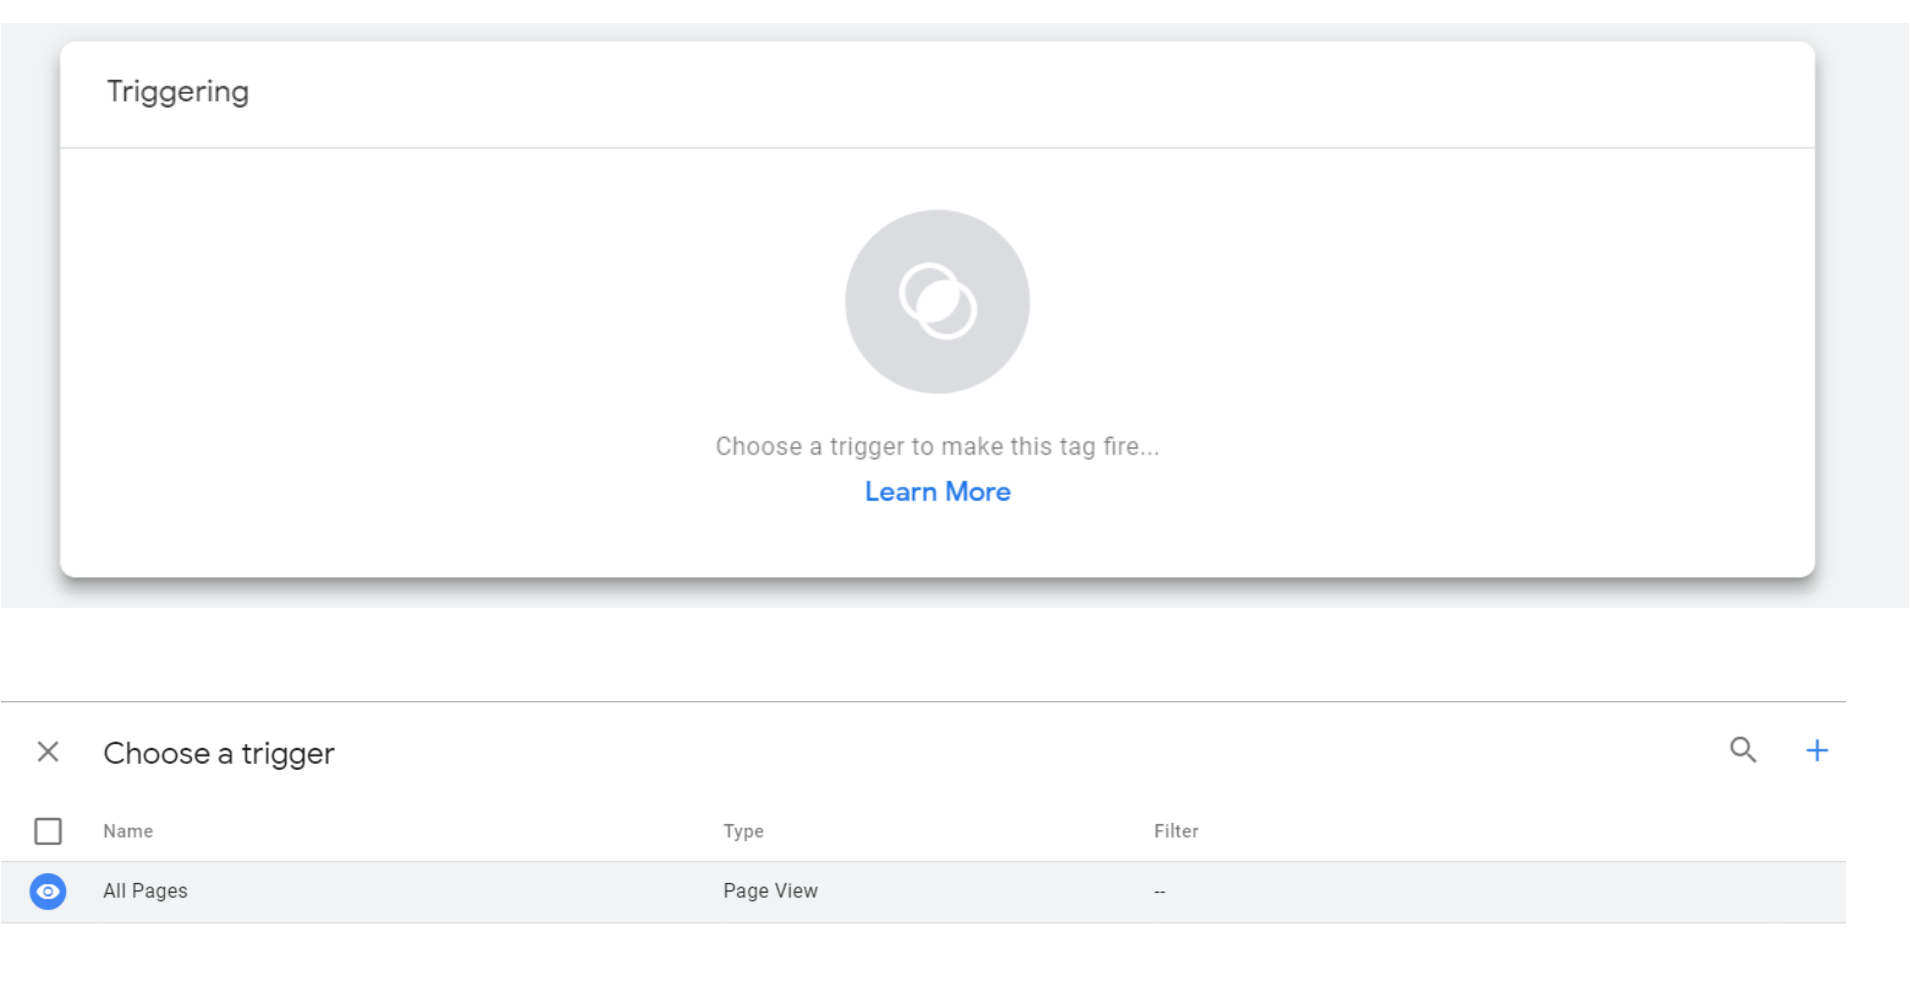
6. Next, select **Triggering panel → All Pages**.
7. Navigate back to the tag preview screen and select **Save**.
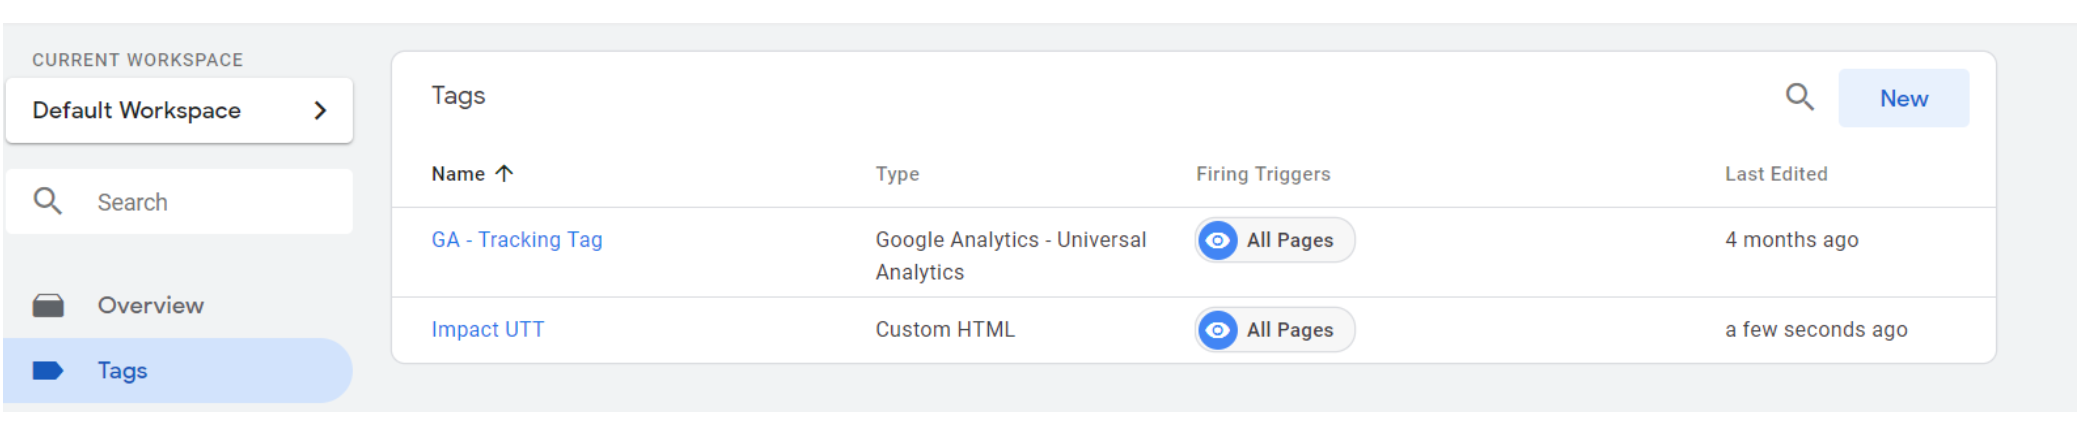
8. Your dashboard tag workspace should look similar to this:
#### Set up data layer variables
Once you have the key that you would like to work with, you can proceed to create a data layer variable.
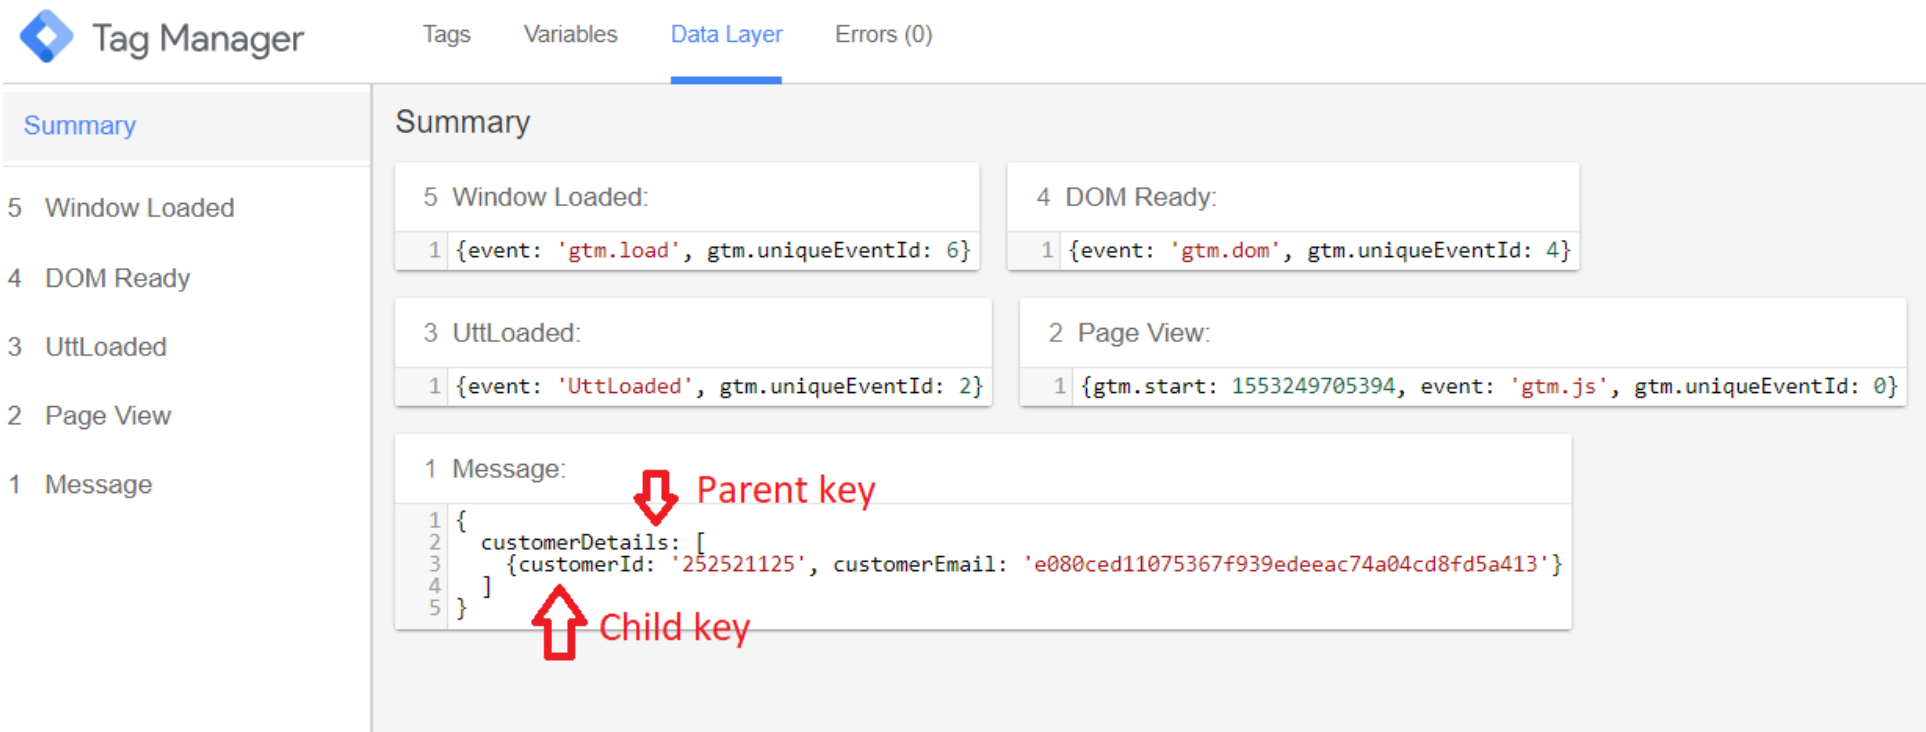
*For this scenario, the keys used will be the customer id and customer email values from the customer details data layer.*
From within your GTM workspace follow the instructions below to create data layer variables:
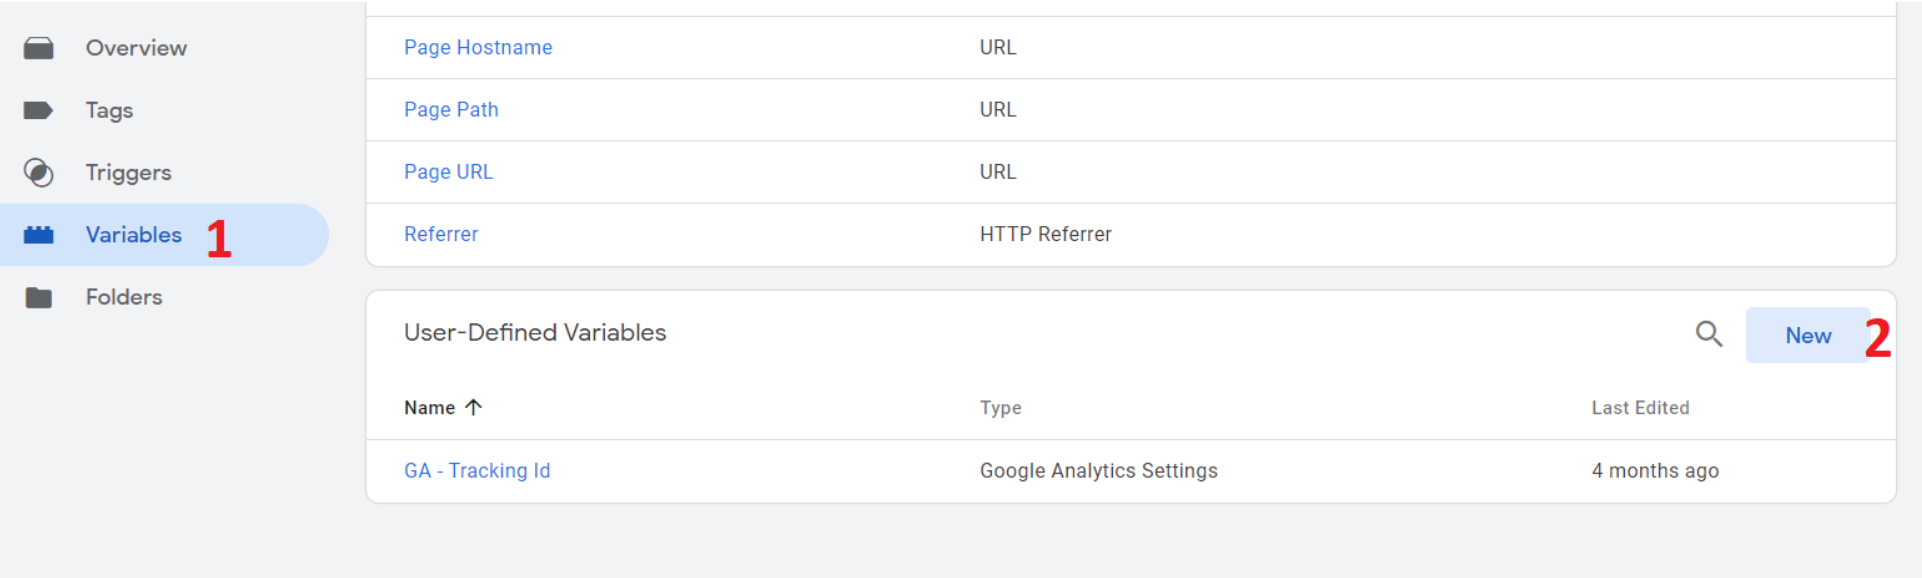
1. Below the *Triggers* menu, select **Variables**.
2. Under *User-Defined Variables*, select **New**.
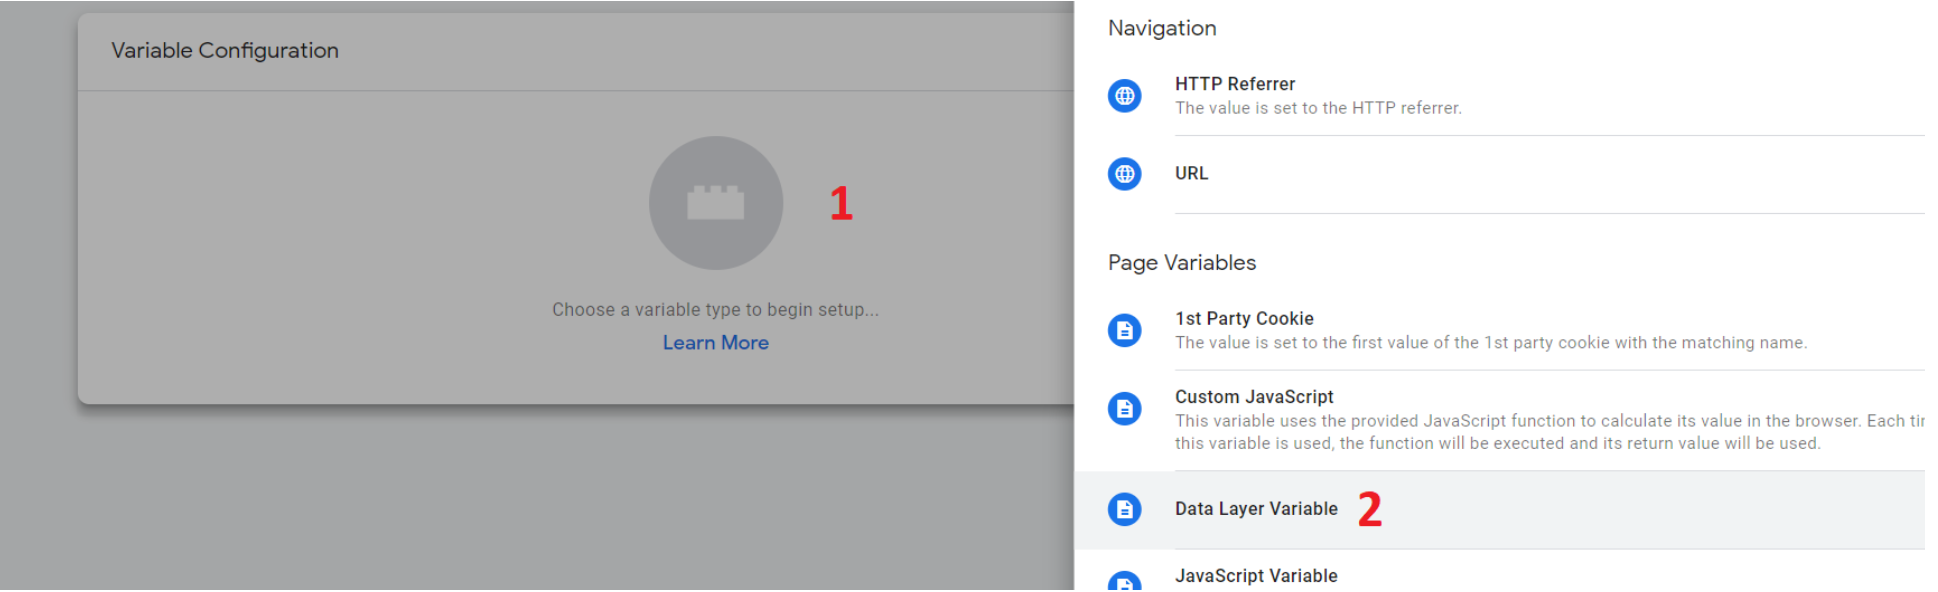
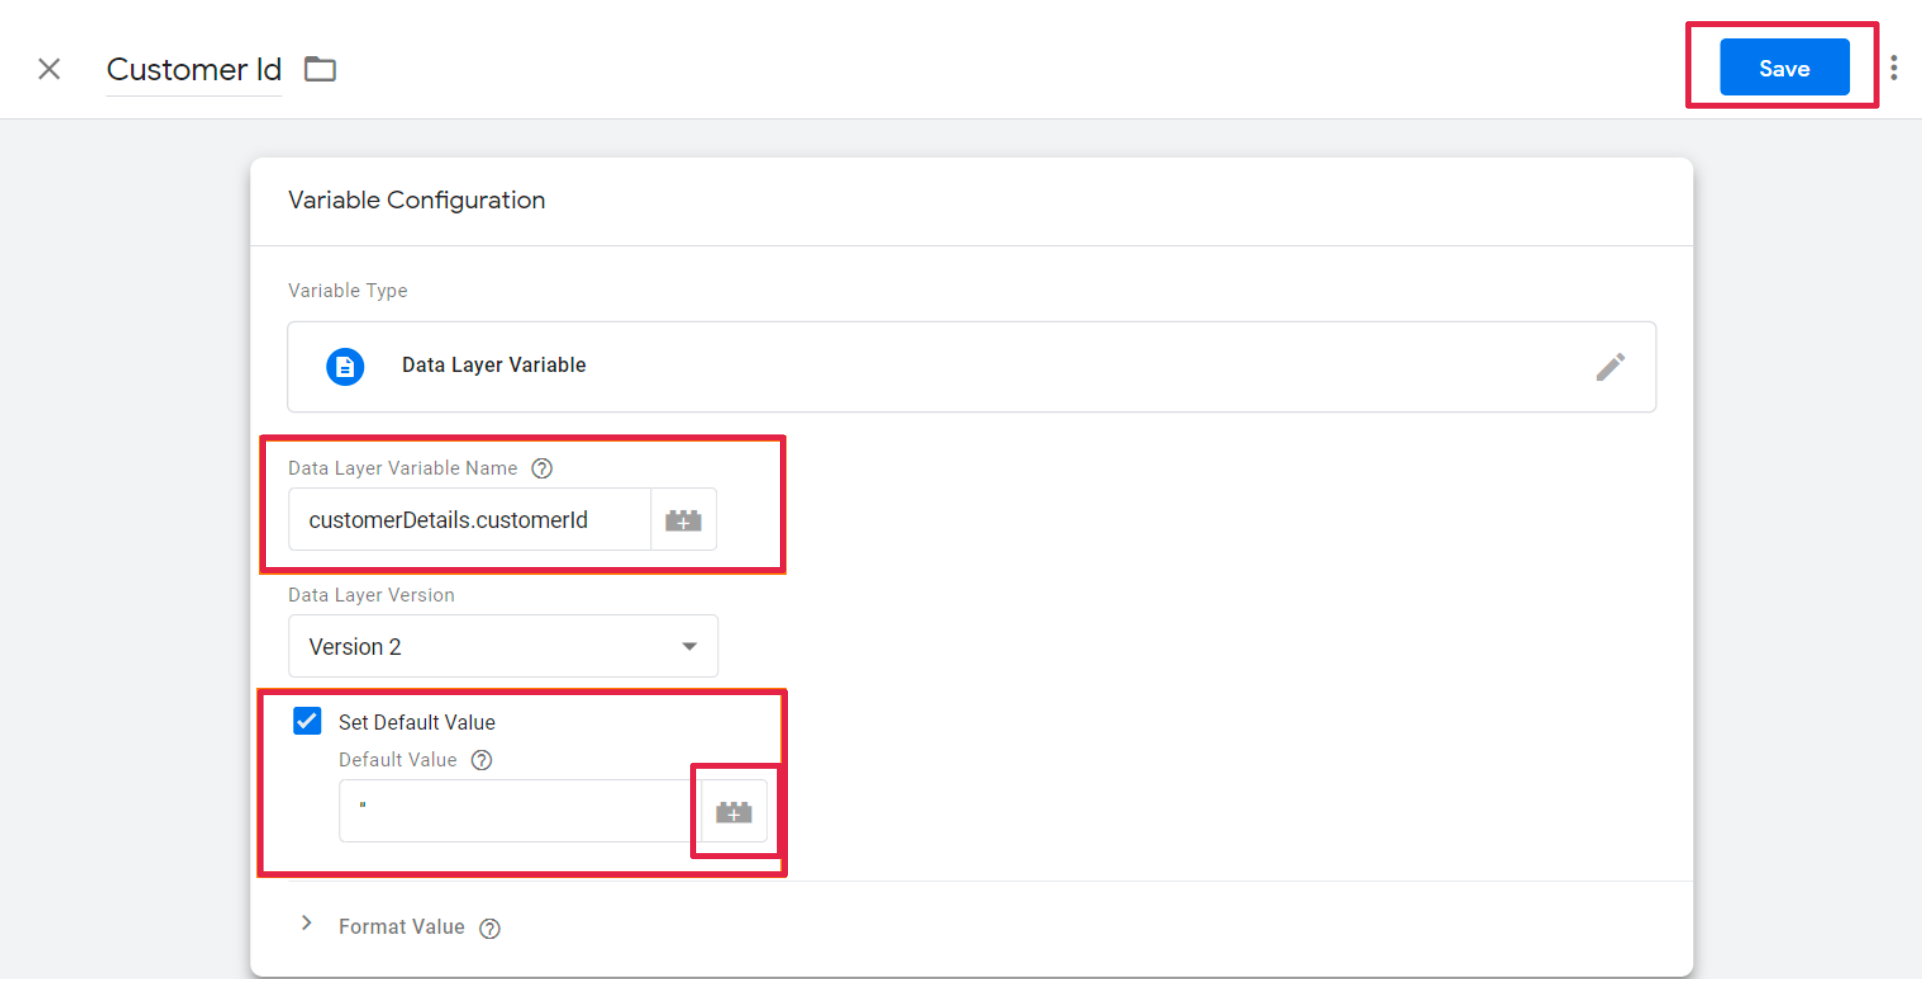
3. Select **Variable Configuration**. Then select **Data Layer Variable** as the variable type.
4. In the *Data Layer Variable Name* field, enter the key exactly as it was written in the code (e.g. `customerId`, not customer Id.).
> Because the data layer in this example is a well-structured nested data layer and has child keys, use the key name of the parent and child elements for the Name. Separate the key names with a dot and give your variable a name as a reference to the key you are using.
5. In the *Set Default Value* hit the space bar, select **Save**.
{% hint style="success" %}
**Note:** The variable name in the above example is `customerDetail.customerId`. If your data layer is not nested, the variable name in the name field will be `customerId`.
{% endhint %}
> Because the customer is not always signed in, GTM would append the value undefined in cases where the `customerId` key is not populated. To counter this we've instructed you to set the default value in the Set *Default Value* field to a single blank space, this will pass a blank value instead of undefined.
6. In most cases you should leave the [*Data Version*](https://support.google.com/tagmanager/answer/7683362#data_layer) set to the default value of Version 2.
7. **Save** the variable.
8. Repeat these steps for every data layer key (i.e. customer email key) that you would like to have as a variable in Tag Manager.
9. Preview the container to save the changes. You will publish the container at a later stage.
{% hint style="success" %}
**Note:** Data layer variables only work on a per-page basis. If you would like the data layer values to persist through multiple page views, you will need to add your own code to pass data layer values between pages.
{% endhint %}
{% endstep %}
{% step %}
### impact.com Identify Function
Now that you have a data layer placed on certain pages or a website and variables configured, the next tag you will be adding to your container is the impact.com identify function. This small but powerful script needs to be implemented on all the pages of your website and should be invoked after the UTT has been loaded.
*The customer id and customer email variables will be used in this scenario once more, as placeholders in the relevant sections of the identify function.*
#### Add the identify tag
Follow the same steps you did in *Step 1: The Universal Tracking Tag*, in order to:
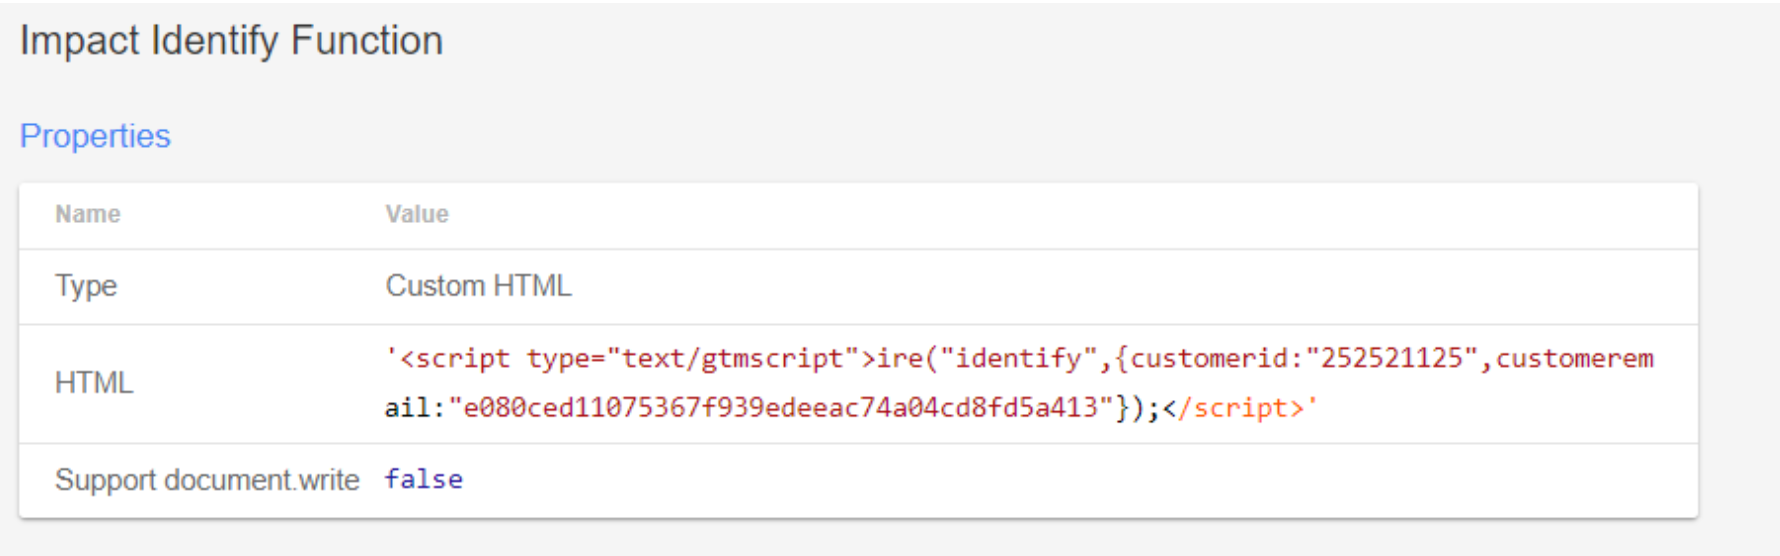
1. Add a custom HTML tag to your container. Instead of using the Universal Tracking Tag, you will add the impact.com Identify script.
2. Remove the default value of the customer id key and replace it with the Customer Id variable you created in step 4 under the *Set up data layer variables* section above. Enclose the variable name in double curly braces.
{% hint style="info" %}
**Tip:** You will notice that when you start typing the first curly brace, GTM will display an autocomplete list of variables you defined under the *data layer variable* section.
{% endhint %}
3. Populate the customer email value with the customer email variable you configured earlier in your data layer.
4. At the end of the identify function, before the closing `` tag, add the following line `dataLayer.push({'event':'IdentifyInvoked'});`
5. Following your technical integration guide from impact.com, the Identify function needs to be placed on all pages and should be invoked **after** the Universal Tracking Tag. This means you only need to create one trigger for the Identify function, to fire directly after the UTT event has fired. The UTT is already triggered to fire on all pages.
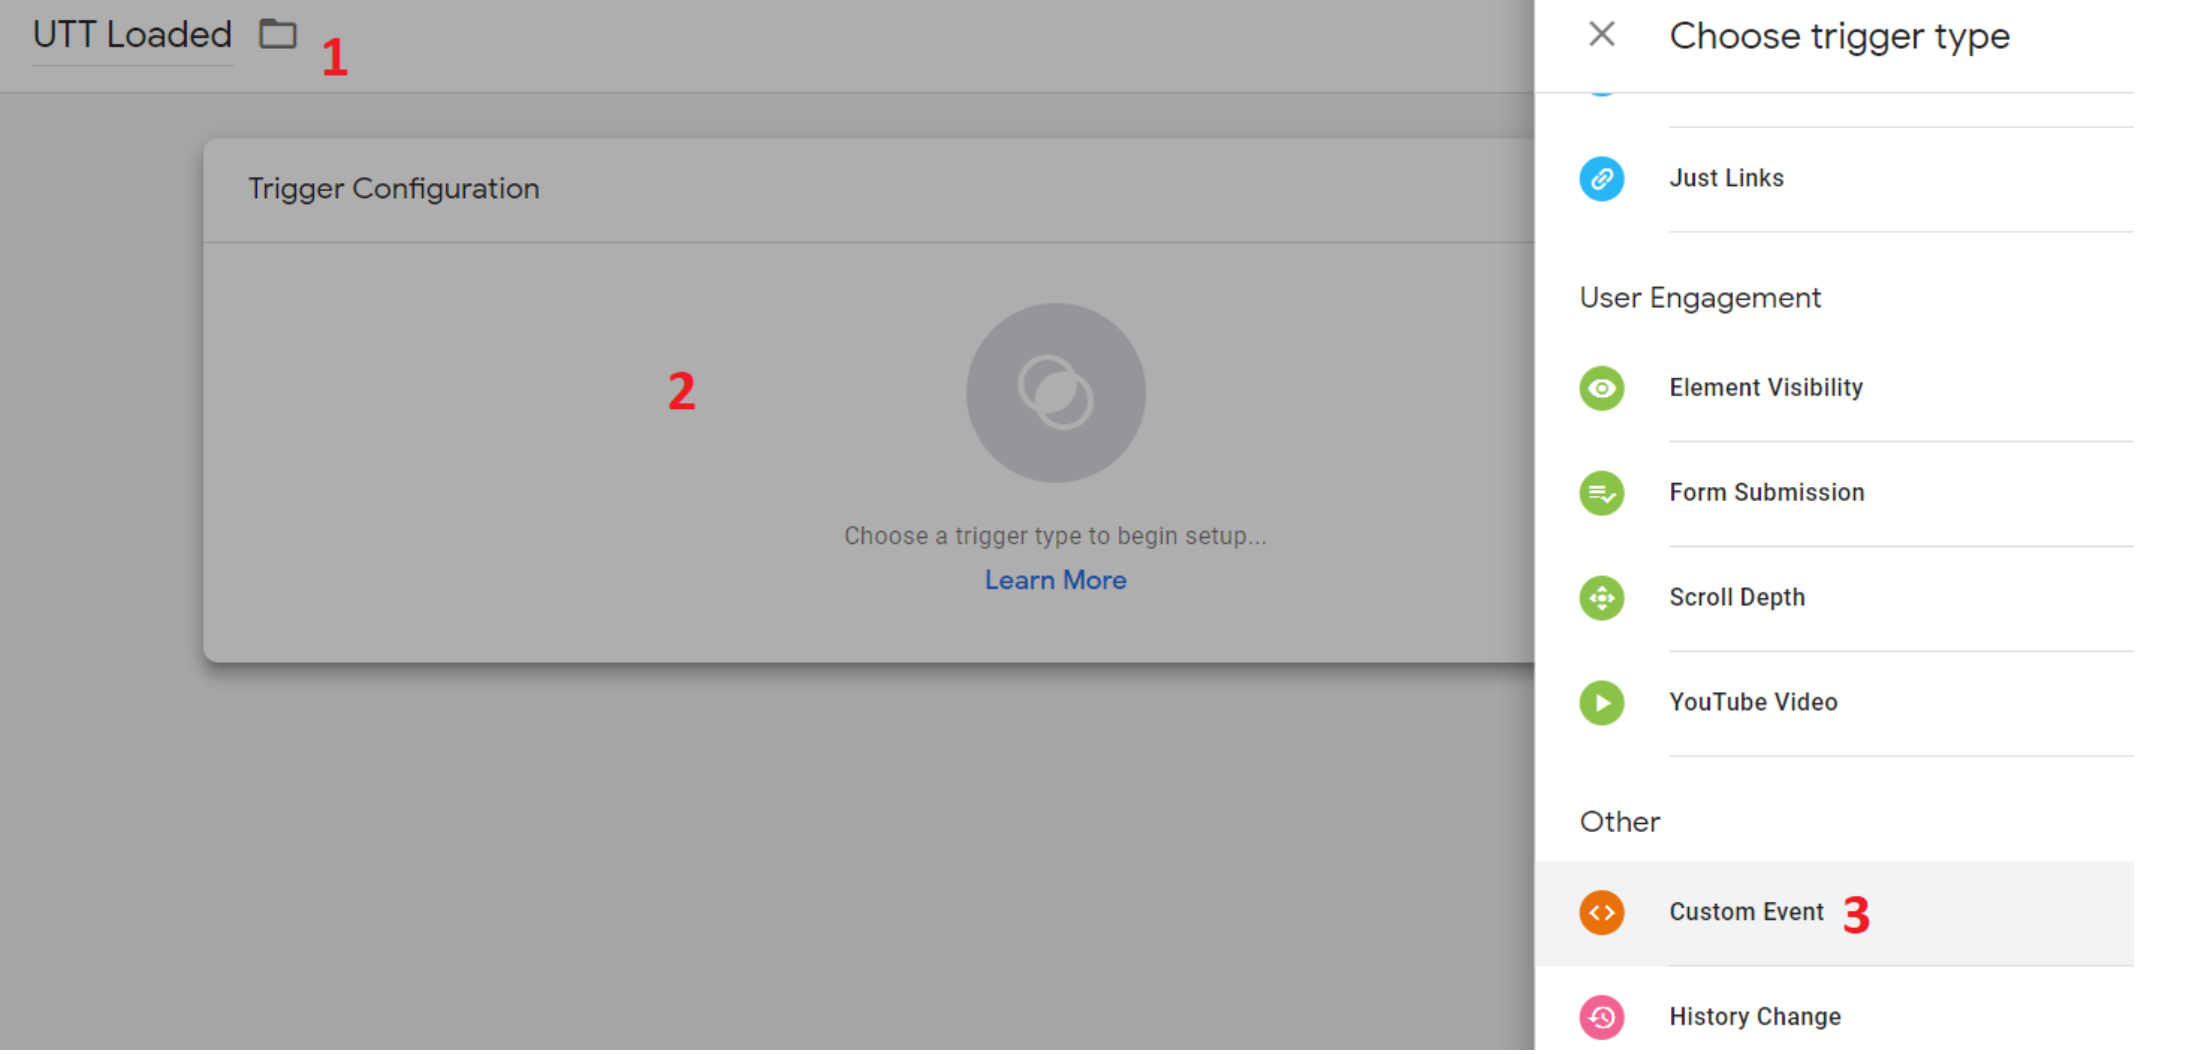
6. You'll notice the *All Pages* trigger has been carried over from the UTT tag. Select **+ \[Plus]** above it to add a new trigger alongside it. You will be creating a custom event trigger to tell GTM to fire the Identify function after the UTT event you've added in step 5 under the *Steps to implement* section (i.e. the `UttLoaded` event).
7. Select the **+ \[Plus]** at the top right corner of the *Choose a trigger* page.
8. Give your trigger a name, then select **Trigger Configuration → Custom Event**.
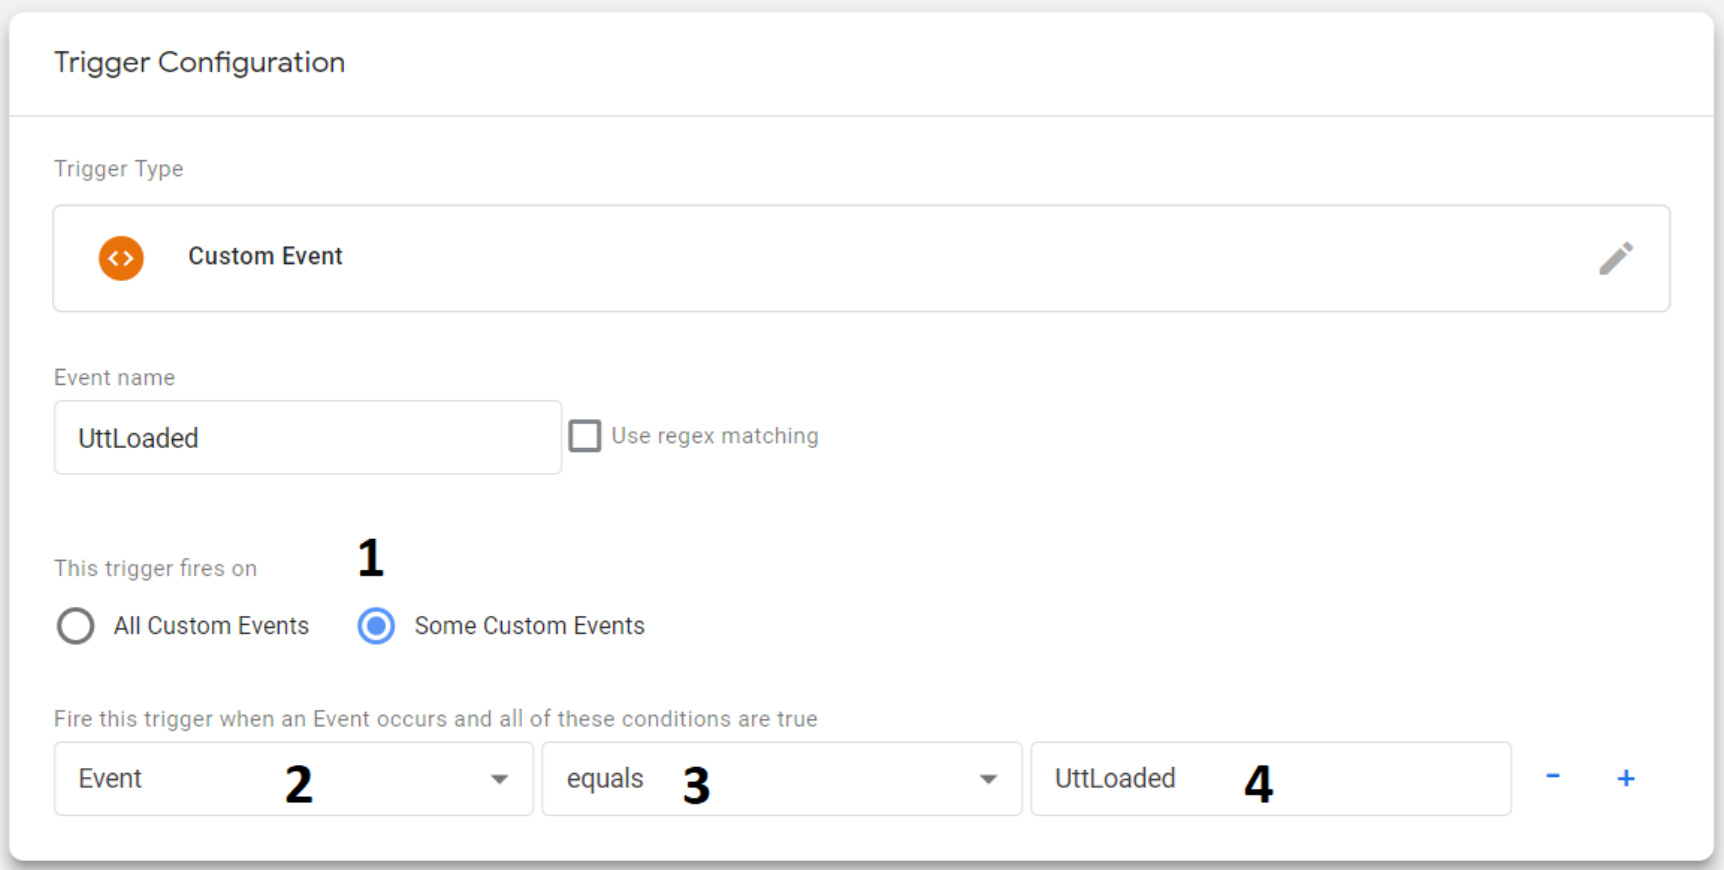
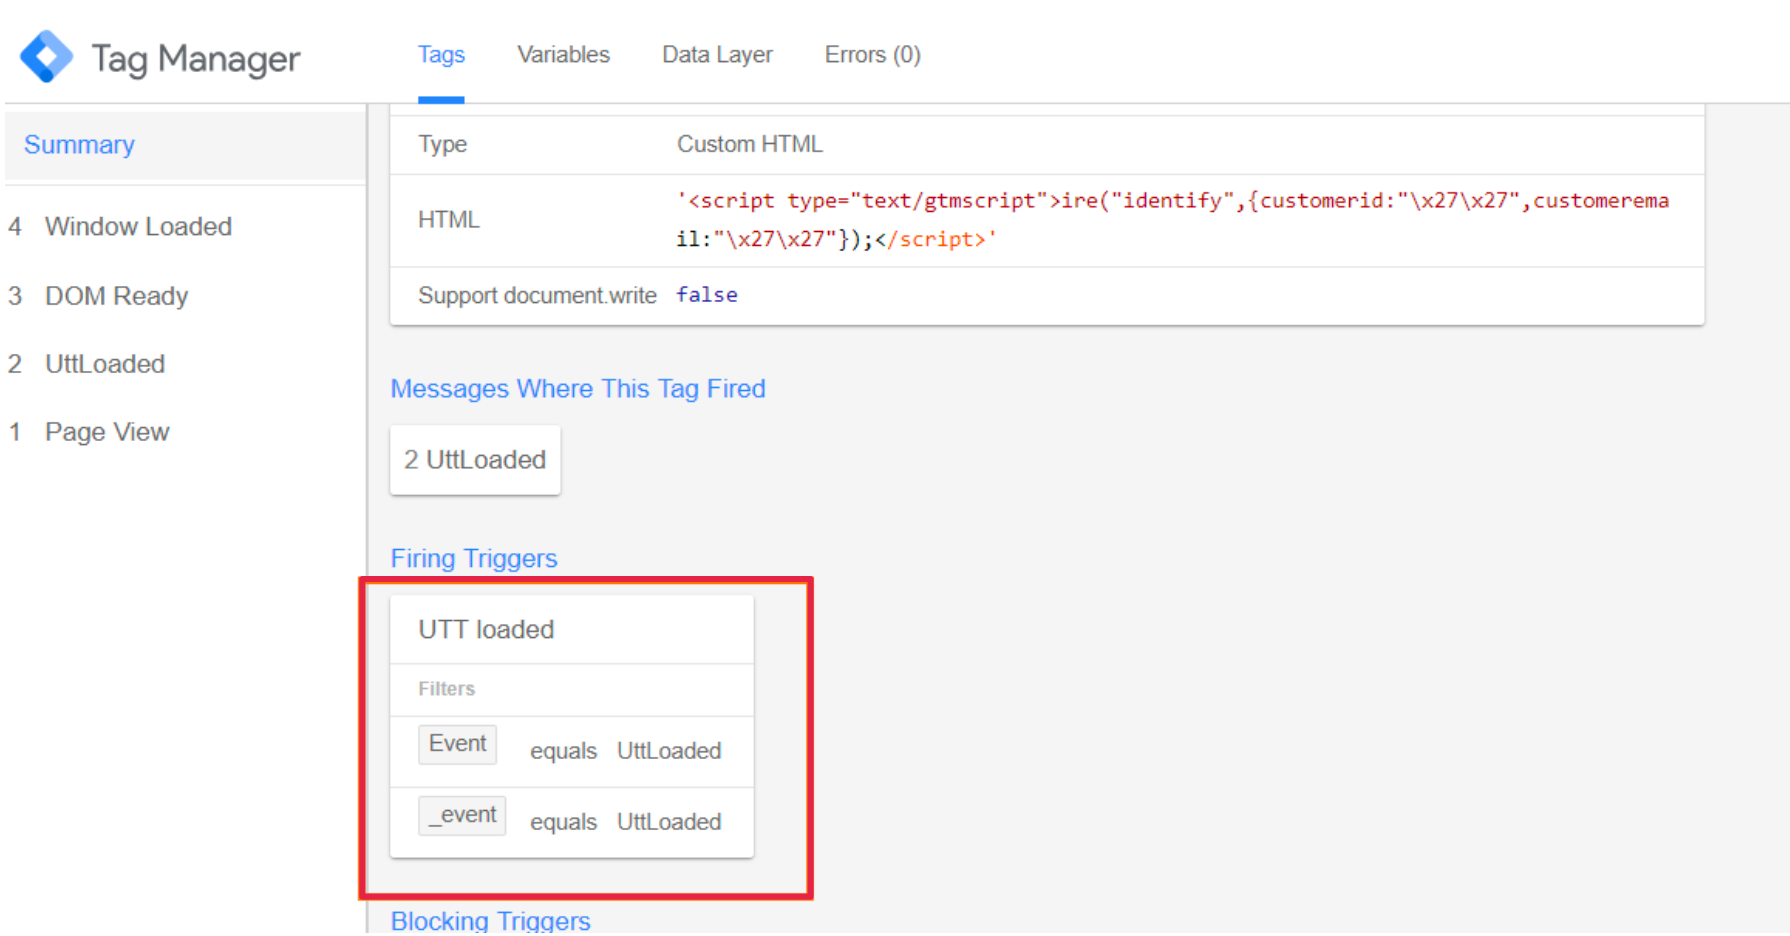
9. The custom event is added as a trigger. Select **Some Custom Events**. Set the first condition to **Event**, the second to **equals** and the third to **UttLoaded**.
10. Select **Save**, then **Save** again, and select **Preview**. Visit your site and have a look at the GTM Debug Console.
11. Select the impact.com identify function. Below the tag is a *Firing triggers* section. It displays the event(s) that invoked the trigger to fire, namely UTT loaded. Remember the Impact UTT is already set to fire on all pages.
12. Time for another test. Sign in or register as a customer and navigate to your customer confirmation page, where you placed the data layer.
13. Test to see if the customer id and customer email variables you added in steps 2 and 3 above have populated correctly.
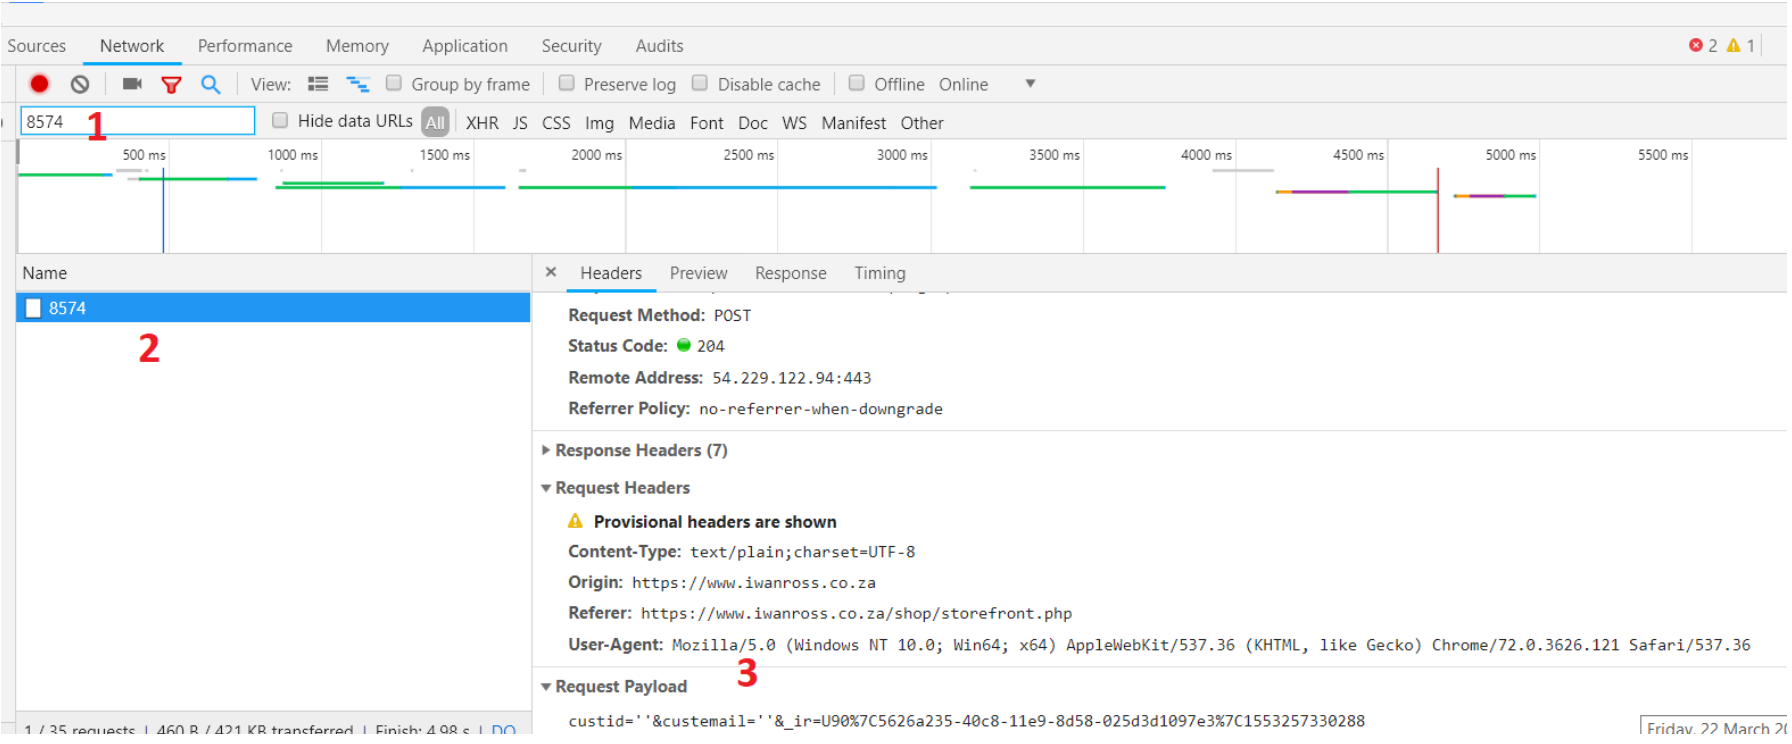
14. Test to see if the customer email key will pass blank values if it is not populated too. Open your browser developer tools and sign out, then navigate to the Network tab of the developer tools console. Provide your **campaign id** in the filter box. Then test to see if the customer id and customer email values were passed with the identify function in the headers.
{% hint style="success" %}
**Note:** Since the confirmation page triggers tend to be focused on the confirmation page, it is easier to omit the identify function on this page. Including the identify tag on the confirmation page is not strictly required but it is encouraged.
{% endhint %}
{% endstep %}
{% step %}
### The trackConversion function
#### The impact.com conversion tracking tag
Tracking events like sales, leads, subscriptions and many more will be the final step in the GTM journey. As in the case of the Identify Function, you will need to configure the tag to fire after another tag has fired, in this case, after the Identify Function. You will also need to modify the conversion tag slightly, to accommodate your data layer variables.
#### Modify the conversion script
If you have a look at your impact.com conversion tag in your account or in the technical integration plan you received during your onboarding phase, it should look something like this, depending on the endpoints you wish to track. In the example below, the `subTotal` parameter is calculated as `quantity` times `price` for each sku.
{% tabs %}
{% tab title="JavaScript" %}
```javascript
```
{% endtab %}
{% endtabs %}
From the above example tracking script, it is evident that you want to track online sale events. If, in the case of tracking leads or subscriptions, you will need to remove the item level details.
{% hint style="warning" %}
**Warning:** Do not copy and paste the above script, the action tracker id is account-specific.
{% endhint %}
The next step is to customize the above script to accommodate your data layer variables as well as support multiple cart items. If your shopping cart only accepts one item at a time, then you can leave the script as is.
{% tabs %}
{% tab title="JavaScript" %}
```javascript
```
{% endtab %}
{% endtabs %}
{% hint style="warning" %}
**Warning:** This sample code is for reference only and may not suit your GTM setup.
{% endhint %}
Contact [support](https://app.impact.com/secure/advertiser/support/customer-support-portal-flow.ihtml) to learn how you can customise the script to suit your conversion tracking requirements, including how to change the Event Type ID (the `ActionTrackerID` shown above) to match the event tracker in your impact.com account.
To find your `eventId`, navigate to  **User profile → Settings**. On the right side of the Settings page, under **Tracking**, select **Event Types**. The `eventId` is displayed next to each event's name.
#### The transaction data layer
The script above has also been adjusted to pass the values of multiple order level items stored in a data layer on your transaction page or order confirmation page. All of the order and item level values in the script are populated from data layer variables.
Below is an example of an e-commerce data layer. As always the data layer script should be placed above your GTM tag in the `` section of your order confirmation page.
{% tabs %}
{% tab title="JavaScript" %}
```javascript
```
{% endtab %}
{% endtabs %}
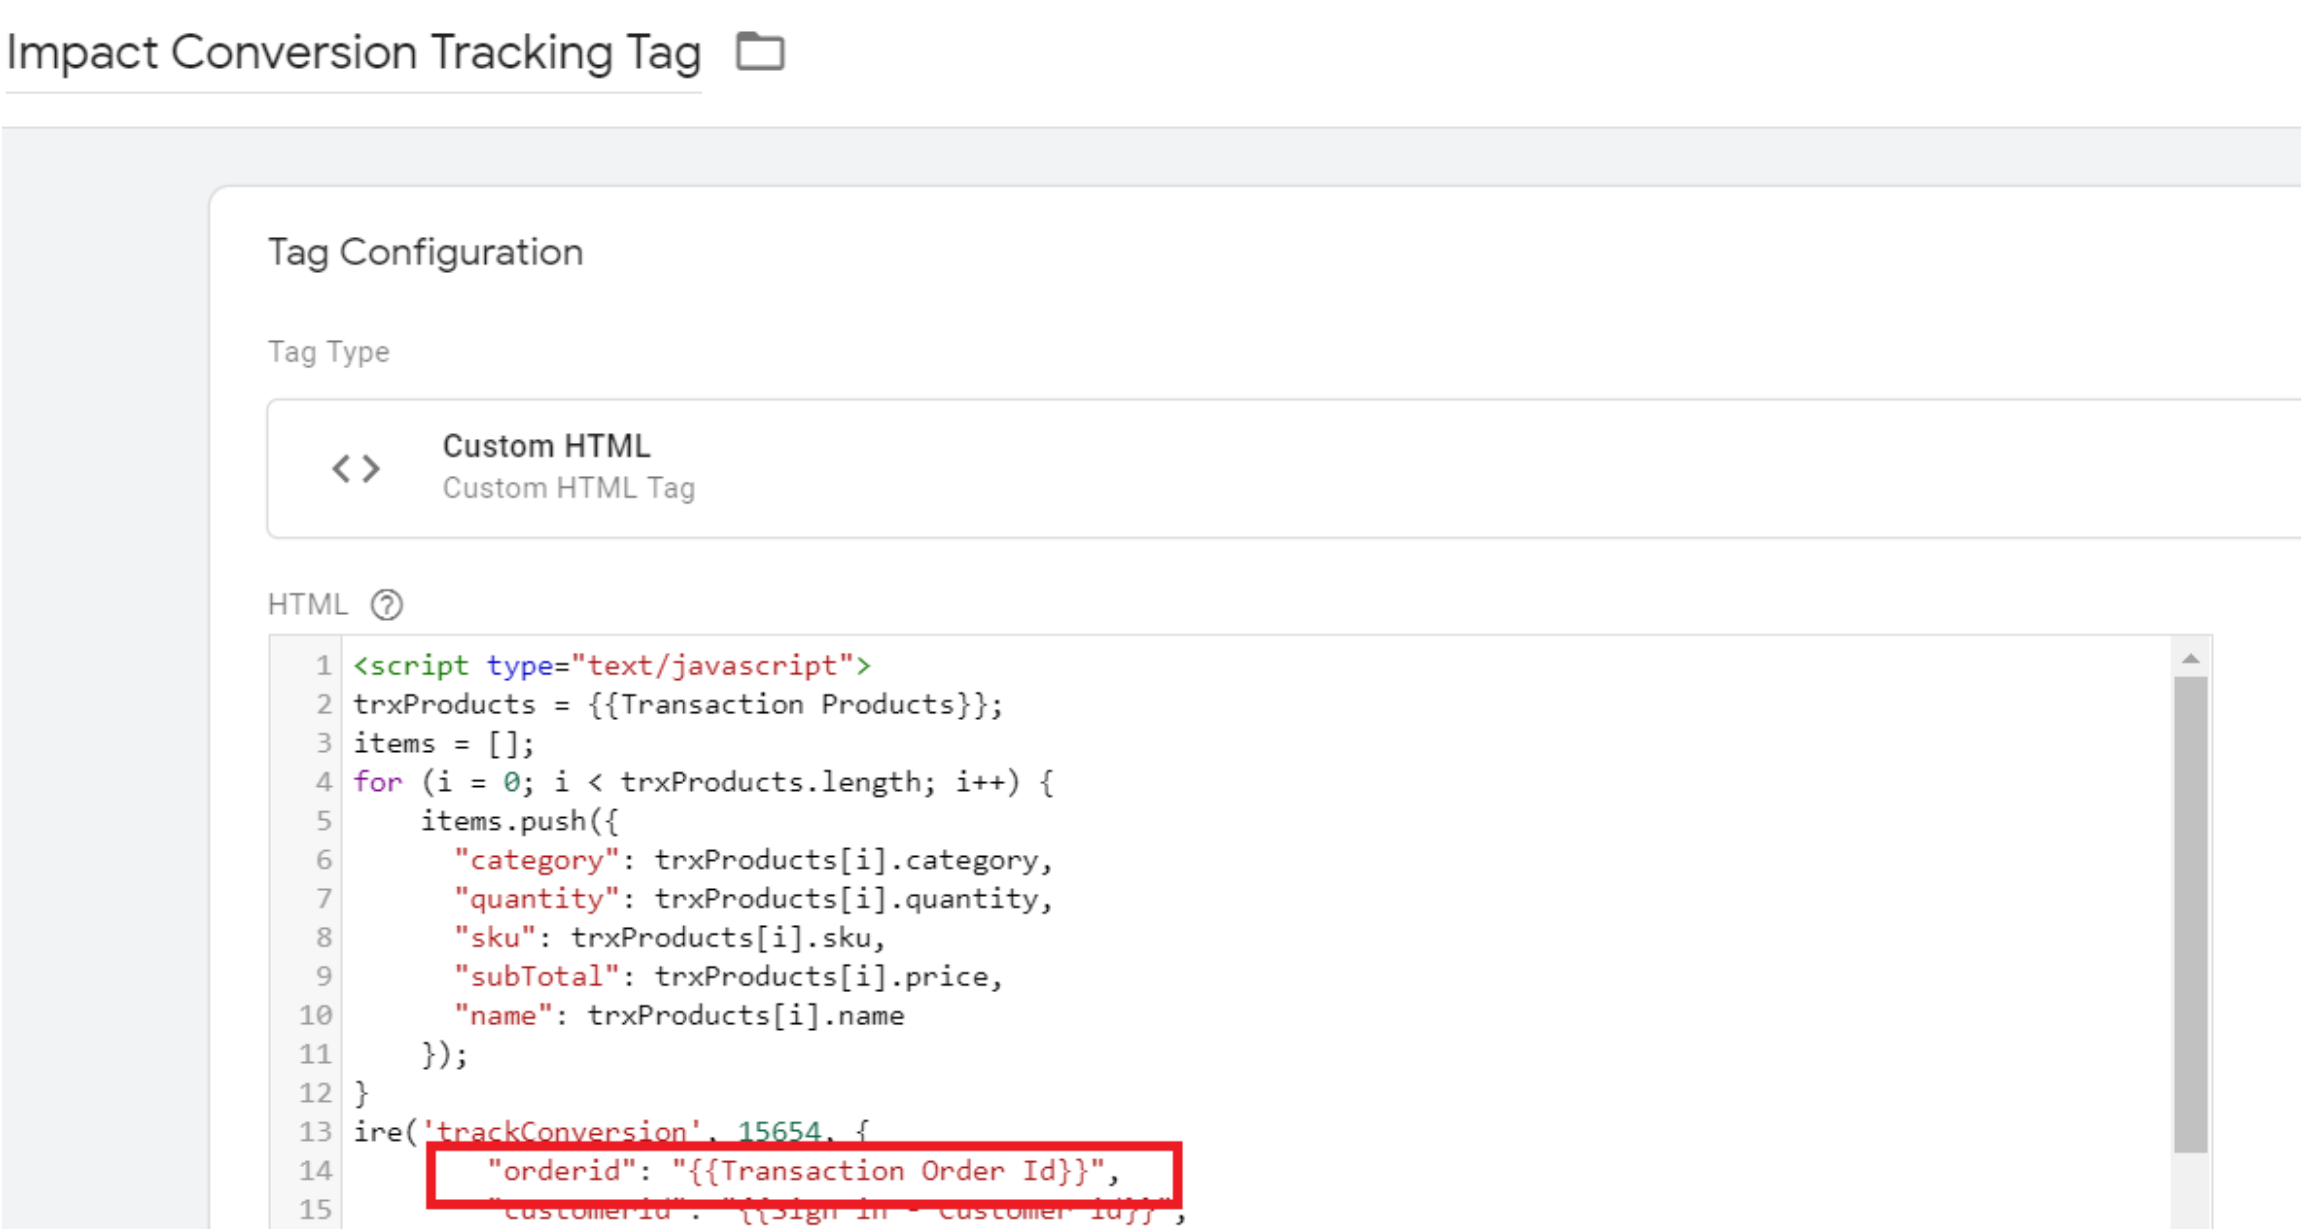
If you have a closer look at the transaction products in the data layer above, you will notice the items (sku, name, category, price, quantity) are child keys of the transaction products key. Compare this to the conversion script and you will quickly notice that you can take a shortcut. Instead of creating variables for each different item in your data layer, you can use a global variable in GTM called *Transaction Products* and reference the child key by separating the key pair with a dot.
**Example**: To reference the item category key, you would use it like this: `{{Transaction Products}}.category`.
#### Placing the impact.com conversion tracking tag
Once you have configured all the data layer variables for your transaction order and item level details, you can place the conversion tracking script in your GTM container. The impact.com conversion tracking tag should be placed on your order confirmation page(s) and requires the UTT.
Because you have already configured the conversion tracking tag to pass your customer id and customer email values, you can exclude the *impact.com identify function* script from firing on the same page as the conversion tracking tag. It is not a requirement, but it is an option.
#### Trigger the impact.com conversion tracking tag
Previously for the identify tag, custom events and all page views were used as triggers to determine when to fire the tag as well as in which order. This time, the impact.com conversion tracking tag only fires on your order confirmation page (after a successful online purchase or subscription event), and after the UTT tag has fully loaded.
To do so, follow the instructions below:
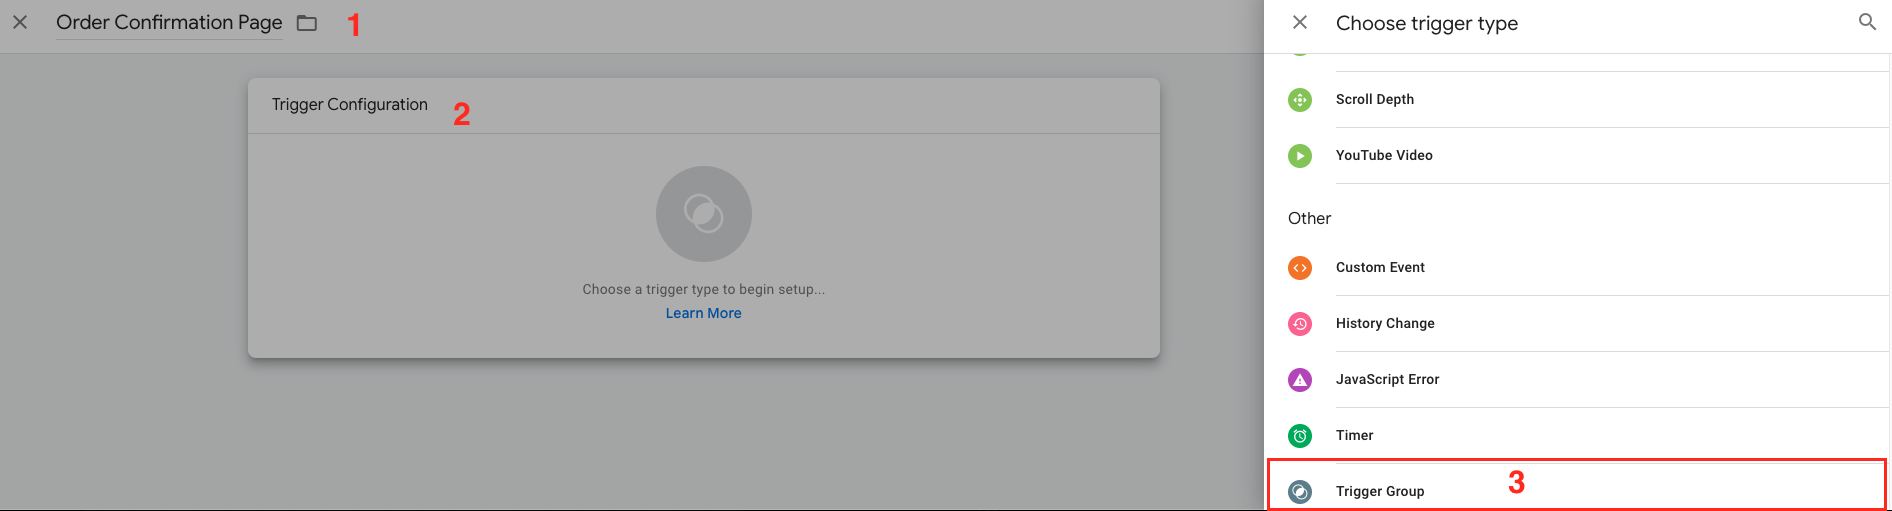
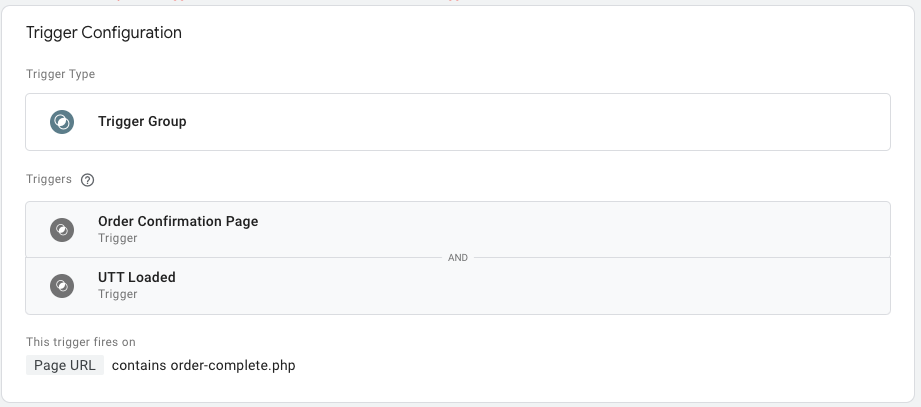
#### Create a trigger group
1. From your workspace, select **Triggers** in the left navigation menu.
2. In the upper-right corner, select **New**.
3. Name the trigger (e.g. Order Confirmation Page).
4. Navigate to the *Trigger Configuration* section.
5. Select **Trigger Group** as the trigger type.
6. In the *Triggers* section, select **Choose a trigger** then select **Order Confirmation Page**.
7. In the *Triggers* section, select **+ \[Plus]** then select **UTT Loaded**.
8. Navigate to the *Trigger Fires On* section, then select **Some Conditions**.
9. Specify the page view conditions, then select **Save**. There are many conditions to select from and the implementation is unique. You can select the **+ \[Plus]** to the right to add additional conditions.
* It is also possible to use the data layer variables as conditions. Select a condition that clearly distinguishes your order confirmation page from your other pages.
10. Select **Save**.
#### Create the tag
1. From your workspace, select **Tags** in the left navigation menu.
2. In the upper-right corner, select **New**.
3. Name your tag accordingly and select **Tag Configuration**.
4. Select **Custom HTML** as the tag type.
5. Input your impact.com conversion tracking script into the *HTML* field.
6. Modify the different fields to match the data layer variables you have configured.
7. Navigate to the *Triggering* section.
8. Choose the trigger group you've created.
9. Select **Save**.
{% endstep %}
{% endstepper %}
---
# Agent Instructions
This documentation is published with GitBook. GitBook is the documentation platform designed so that both humans and AI agents can read, navigate, and reason over technical content effectively. Learn more at gitbook.com.
## Querying This Documentation
If you need additional information that is not directly available in this page, you can query the documentation dynamically by asking a question.
Perform an HTTP GET request on the current page URL with the `ask` query parameter, and the optional `goal` query parameter:
```
GET https://integrations.impact.com/integration-guides/for-brands/tracking-integrations/google-tag-manager/implementation.md?ask=&goal=
```
`ask` is the immediate question: it should be specific, self-contained, and written in natural language.
`goal` is optional and describes the broader end goal you are ultimately trying to accomplish on behalf of the user. GitBook uses it to tailor the answer towards what is most useful for that goal.
The response will contain a direct answer to the question and relevant excerpts and sources from the documentation.
Use this mechanism when the answer is not explicitly present in the current page, you need clarification or additional context, or you want to retrieve related documentation sections.