
(Unused) End-to-End Testing
When testing, impact.com recommends:
-
Test with multiple browsers — we recommend Google Chrome, Mozilla Firefox, and if possible, Apple Safari.
-
If possible, temporarily pause all extensions running in your browser, or use fresh browser profiles to test default browser configurations not in incognito mode:
-
Create Chrome browser profiles (Google Support).
-
Profile Manager - Create, remove or switch Firefox profiles (Mozilla Support).
-
-
When testing in each browser, open the developer tools before testing and switch to the Network panel:
-
Open Chrome DevTools (Chrome Developers Help), Inspect network activity (Chrome Developers).
-
Firefox Developer Tools (Mozilla Support), Network Monitor (Mozilla Support).
-
Use the developer tools in the Develop menu in Safari on Mac (Apple Support), Network tab (Safari Developer Help).
-
Verify the UTT & functions are loading
Step 1: UTT
Verify the UTT
With your browser’s developer tools open to the Network panel/tab, navigate to your site’s landing page.
In the network panel, filter the list of requests for
impact.If the UTT is firing, you’ll see a request with a 200 response code from
utt.impactcdn.comwith a uniquely named JavaScript file:Navigate to other pages on your site (such as your storefront, product or services pages, etc.) and verify that the UTT is firing on those pages as well.
Repeat steps 1–4 with a different browser.

Step 2: identify function
identify functionVerify
identify
Open your browser’s developer tools to the Network panel/tab.
In your browser’s URL bar, input your site’s landing page and append
?irclickid=impacttestas a query string parameter, then press Enter.In the network panel, filter requests only to Fetch/XHR and search for your Program ID value.
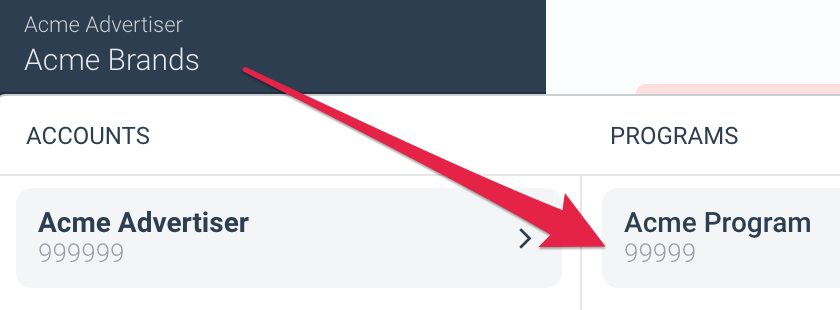
Remember, your program ID value is visible in your account here:
If the tag is firing, you’ll see a request with a 200 response code from your Tracking Domain (e.g.,
example.pxf.ioorexample.sjv.io).In your browser’s developer tools, select it and view the Preview/Request tab to see what’s being passed.
Repeat steps 1–5 on several other pages of your site to confirm it’s firing elsewhere.
Repeat the full instruction set in a different browser.
Verify
identifywhile logged in
Open your browser’s developer tools to the Network panel/tab.
In your browser’s URL bar, input your site’s landing page and append
?irclickid=impacttestas a query string parameter, then press Enter.In the network panel search for your Program ID value.
If the tag is firing, you’ll see a request with a 200 response code from your Tracking Domain (e.g.,
example.pxf.io).In your browser’s developer tools, select it and view the Preview/Request tab to see what’s being passed — make sure that
customerIdandcustomerEmailare passing values.Repeat steps 1–5 on several other pages of your site to confirm it’s firing elsewhere.
Repeat the full instruction set in a different browser.
Step 3: trackConversion function
trackConversion functionVerify
trackConversionwhile logged in
Open your browser’s developer tools to the Network panel/tab.
In your browser’s URL bar, input your site’s landing page and append
?irclickid=impacttestas a query string parameter, then press Enter.Complete a test conversion in your store to reach the order confirmation page.
While on the page, use the network panel to search for your Event Type ID.
If the tag is firing, you’ll see a request with a 200 response code from your Tracking Domain (e.g.,
example.pxf.io).In your browser’s developer tools, select it and view the Preview/Request tab to see what’s being passed.
Confirm that all passed parameters look correct.
Troubleshooting
If the UTT or a function isn't loading, first check that you've paused all extensions in your browser while testing. Ideally, you’ve created a fresh browser profile with default settings, and third-party cookies are not blocked by your browser.
UTT
-
You've completed Step 1 of the Installation section correctly — the UTT needs to be placed globally at the top of the HTML element across your site, not just your store.
-
You've copied over the UTT code correctly from your Technical Integration Plan onto your site or your tag manager. Check the code you've installed against the code in your tech plan.
identify
identify-
You've completed Step 2 of the Installation section correctly — the identify tag needs to be placed within every
<body> </body>HTML element on all pages of your site, ideally near the top. -
The UTT needs to fire before
identify— confirm that your implementation or tag manager is configured to enable the UTT to load first.
trackConversion
trackConversion-
You've completed Step 3 of the Installation section correctly — the
trackConversionfunction needs to be placed within the<body> </body>HTML element on the order confirmation page of your site, ideally towards the top. -
The UTT needs to fire before trackConversion — confirm that your implementation or tag manager is configured to enable the UTT to load first.
End-to-end conversion test
Complete a full end-to-end test with an impact.com test partner account to:
-
Test that partner tracking links are working correctly — forwarding visitors to your landing page (or deep-linked page) with a unique
?irclickid=impacttest. -
Confirm that conversions are being correctly reported to impact.com with all required online sale data.
-
Conversions (actions) are being correctly attributed to partners.
-
Action reversals & modifications are working as expected.
Step 1: Create a 0% Test Contract
Create 0% Test Template Terms
Creates a new set of template terms with a 0% default payout (or "commission") for testing with a test partner account.
- From the left navigation menu, select Contracts → Template Terms.
- In the upper right corner, select Create Template Term.
- For the Name, enter Test Terms.
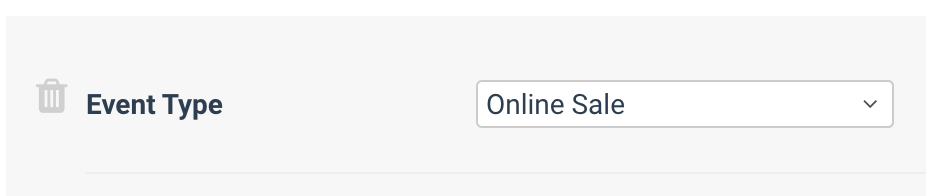
- For Event Type, select Online Sale.
- Set the Default Payout to 0% of order sale amount.
- Scroll down and select Save.

Step 2: Get Branded Links
0% Template Terms sign up link
Gets the unique URL that will send users to sign up as a new direct partner to your impact.com program on your 0% template terms.
- From the left navigation menu, select Contracts → Template Terms.
- In the list, find your test template terms you created in the last step. Under the Actions column, select
[Down Caret] → Get Branded Links.- Next to Promo Page Link, copy the full URL and paste it somewhere accessible, such as a text editor.

Step 3: Create a test partner account
Direct Partner sign up
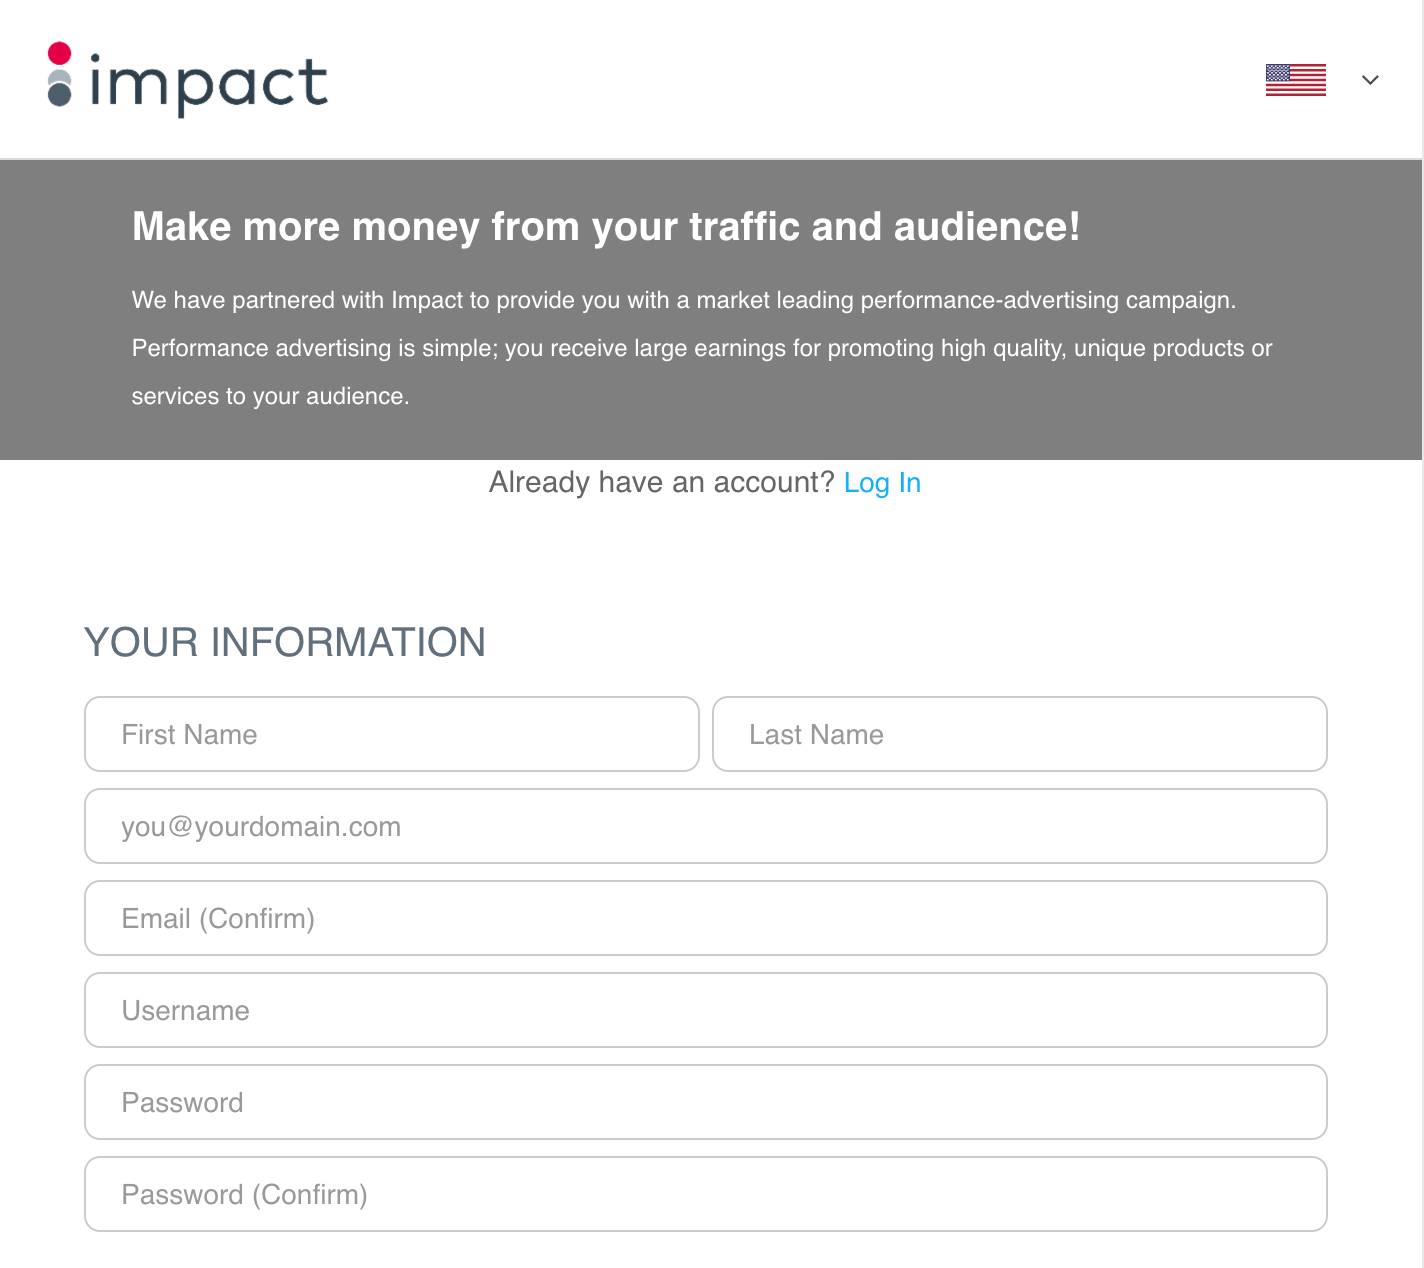
Create a new direct partner account that's applying to your impact.com program on the 0% test template terms.
In a new tab, copy and follow the link from the last step.
Follow the prompts onscreen to create a direct partner account for your brand.
Make sure to use a different email address and username from your impact.com brand account. Keep the username and password saved somewhere easily accessible, as you'll need to access it later.
Select Sign Up.
We recommend adding
TestPartnersomewhere in the partner's name (e.g.,YourBrand_TestPartner) to ensure everyone with access to your Impact account knows this is a test account. Be sure to save the password somewhere safe.
Step 4: Accept your test partner account
Accept partner proposal
Accept the test partner account's application and signs them to the 0% test template.
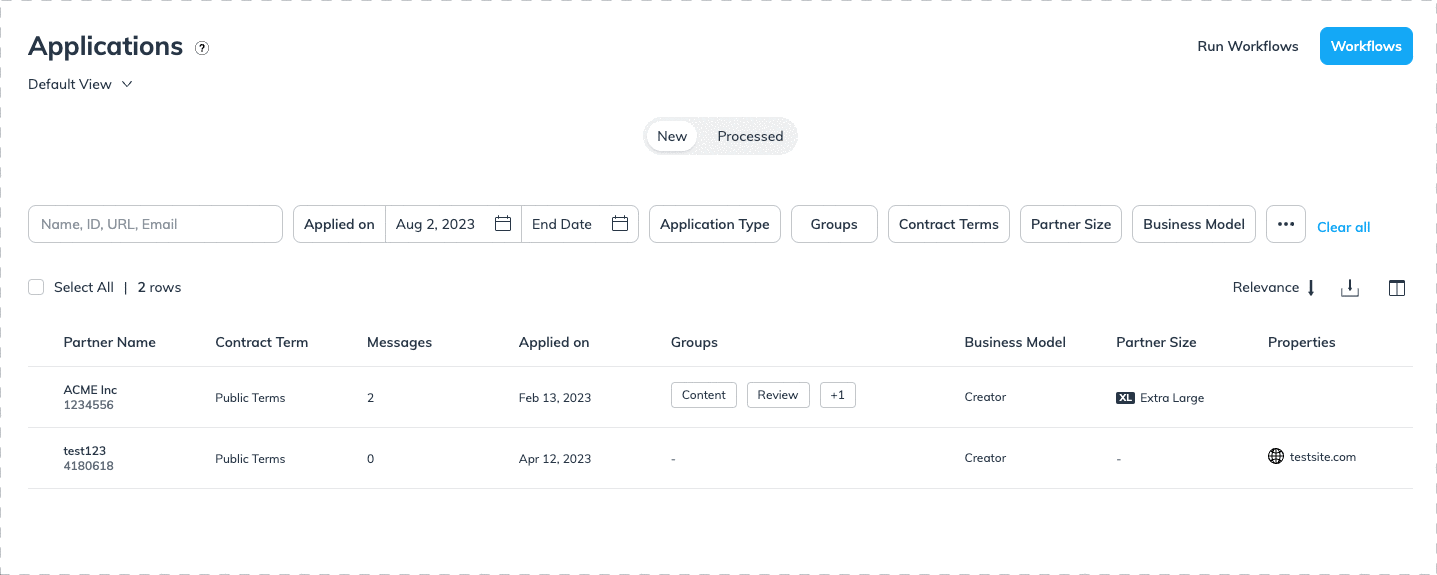
Back in your impact.com Brand Account, in the left navigation menu, select Partners → Applications.
Under New applications, find your test account application.
Hover your cursor over the line where the application is and select ⋯ [More] → Accept.
Step 5: Get a partner tracking link
Create a Link
Creates a new tracking link in the test partner account, which is used to forward traffic to your store and attributes conversions to the partner.
- In an incognito/private browser window, sign in to your test partner account.
- On the dashboard, find the Create a Link widget.
- Select the link to copy it to your clipboard.

Step 6: Test Conversion Events
Important!
When testing, consider disabling any ad-blocking and/or script-blocking extensions that may be active in your browser to avoid potential issues. Make sure to use your test partner tracking link to access your site!
For the most accurate results and fastest launch time, impact.com recommends testing a conversion in your live store, then canceling the order once you've confirmed that it's been tracked.
Complete a test conversion event
In an incognito/private browser window, paste & follow the tracking link from Step 5.
Once you've reached the landing page, complete a test conversion event in store with the following:
At least two (2) items with different SKUs
An item with a quantity value of 2 or more
_ Apply a promo code (or coupon code) to the orderComplete the order and check out, making sure to reach your store's "Thank You" or "Confirmation" page to confirm that the order went through.
Step 7: Verify actions in Impact & reverse order
Note
Your test conversion should appear in impact.com within 30 minutes, but can take up to 2 hours before appearing. If your conversion doesn't appear in impact.com within 4 hours of the test conversion occurring, reverse the order in your store, create a new tracking link in your partner account, then try another test conversion through your new test partner link.
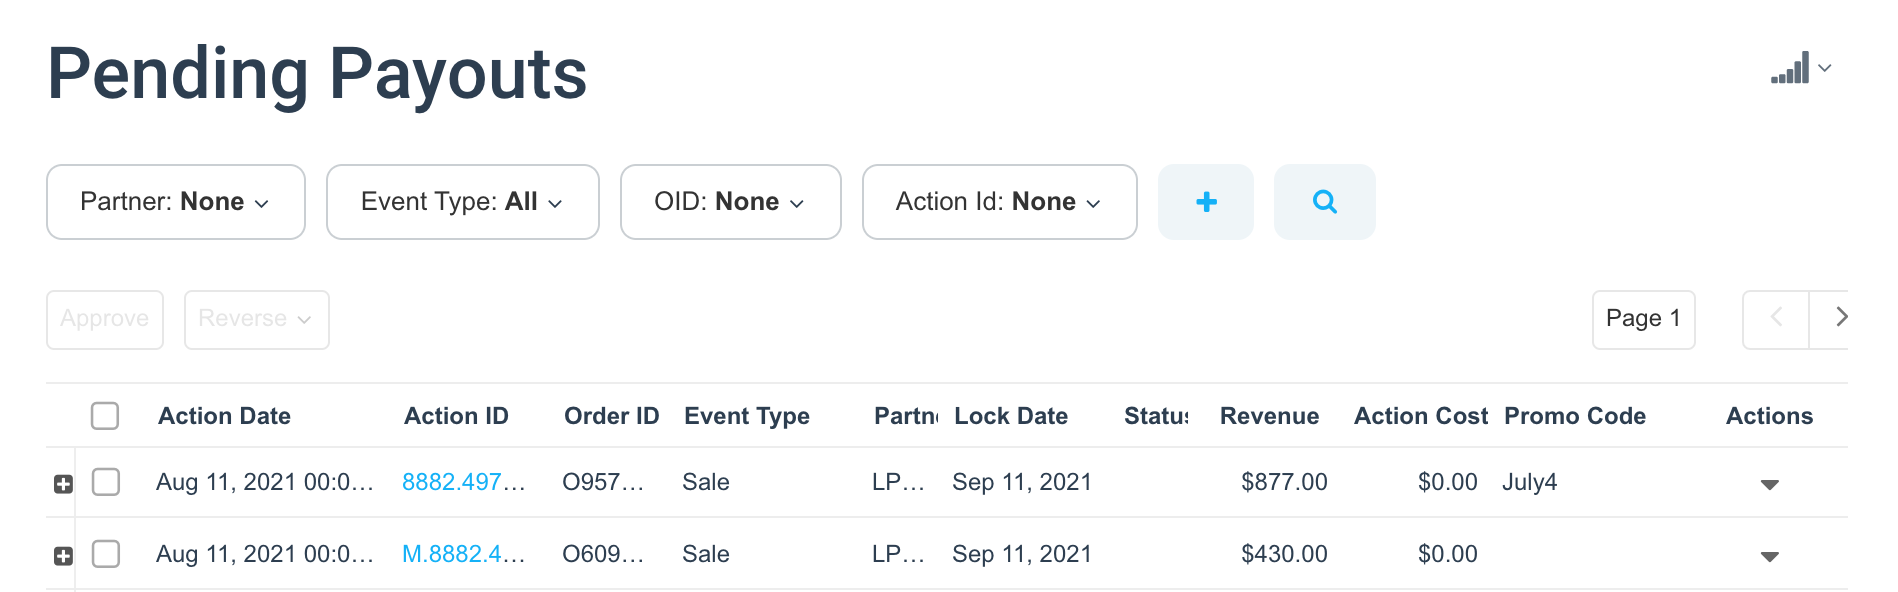
View Pending Payouts
- In your impact.com brand account, navigate to Transactions → Pending Payouts → Actions.
- Verify that your test conversion events appears as a pending payouts.
- Select the linked Action ID to view action details. Order ID should match your store Order ID, items and SKUs should appear, and the promo code used should appear as well.
- Once you can verify the conversion was accurately reported in impact.com, make sure to Cancel the order in your store.
Updated over 1 year ago