Integrate with Salesforce
B2B SaaS brands can use Salesforce and impact.com together to monitor and track conversion events, like leads and business opportunities. With flexible mapping, marketers can set conditions that trigger conversion events, allowing to be paid through impact.com’s contracting and commissioning features.
The integration works in both directions, meaning you can use impact.com to set up a hosted widget that captures B2B SaaS Leads, Opportunities, Contacts, and Accounts from your partners and automatically send them to Salesforce via an API integration. When these records turn into deals, sales, or reach meaningful milestones, the changes can be sent back to impact.com as conversion events.
How it works
- With a few clicks, verify that your impact.com account is ready to go for the Salesforce integration, making adjustments to a few account settings as necessary.
- Then, you'll install the impact.com package in Salesforce and configure a few settings.
- Once configured, you can customize the data parameter mapping to establish which events from Salesforce you want impact.com to track and report on.
Currently this is a integration that supports the following Salesforce objects:
- Leads
- Opportunities
- Contacts
- Accounts
Integration Prerequisites
Lead submission tracking
You can set up lead submission tracking via impact.com or Salesforce:
Track leads via impact.com
Lead submissions can be tracked using via impact.com's Universal Tracking Tag (UTT), which is a small piece of JavaScript code that can be loaded using a Tag Manager solution, or placed manually on your website. Using the UTT offers richer user-level reporting in impact.com, supports Optimize, Direct Tracking features, and more. If you're planning to track lead events using the UTT, the Customer ID value sent via the TrackConversion function must also be available to the Salesforce objects that are being monitored and reported on. In other words, Salesforce needs to receive a Customer ID value in order for the integration to accurately correlate events.
Refer to the account setup steps below to ensure your account is configured correctly.
Track leads via Salesforce
Lead submission can also be tracked through Salesforce. impact.com appends an im_ref parameter + dynamic value (per click) on your landing page URLs. Example link: yourdomain.com?im_ref=clickid123. The clickId value (clickid123) must be captured and stored. When the user submits the lead form, the clickId value must be sent in a hidden field to Salesforce. There must be a consistent ID available in Salesforce objects that are being monitored and reported on to send in the CustomerId parameter.
Account setup
Follow the prerequisite steps below to ensure their account is ready for the integration. At a high level, these include:
- Verify that a couple key account settings are properly configured.
- Confirm that your account is ready for the Salesforce integration, and make adjusts if needed.
- Establish a unique customer identifier (e.g.,
customerId) that persists across all entities that need to be tracked — from when a new lead is tracked, to when it becomes an opportunity, etc.
Establish a Customer Identifier
As part of your tracking integration, you'll need to generate a unique customer ID value across each event type to be tracked.
- If you're using the impact.com UTT tracking integration, your lead form site will need to generate a unique Customer ID value that's passed when a potential lead submits the form, and this value needs to be passed across each event type as the lead progresses towards a "Signed Contract" final state in order to ensure that it's the same customer and the partner that referred them receives credit. Learn about the UTT
identifyfunction. - If you're tracking via API, refer to the Conversion object reference documentation — your lead form site will need to generate a unique Customer ID value that's passed when a potential lead submits the form, and this value needs to be passed across each event type as the lead progresses towards a "Signed Contract" final state in order to ensure that it's the same customer and the partner that referred them receives credit.
Check before integrating
impact.com will complete several integration steps on your behalf. Check with your implementation engineer to ensure that the following configuration steps have been completed: Event Type, Gateway Tracking, General Tracking.
Installation
Step 1: Install the impact.com package to Salesforce
Only Salesforce System Administrators should install and configure the impact.com package.
- Visit the impact.com Partner Manager Salesforce AppExchange page.
- Select Get It Now.
- Follow the on-screen instructions to get the impact.com app installed.
- If you experience any issues installing from the AppExchange, please use this direct link instead.
Step 2: Configure your impact.com credentials in Salesforce
You'll need your impact.com Account SID, Auth Token, and Program ID.
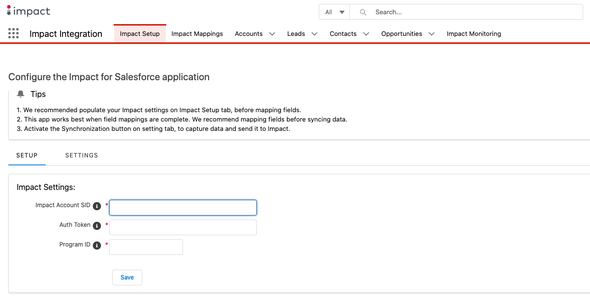
- In your Salesforce account, navigate to the Impact Setup tab.
- In the tab, input the required fields:
- Select Save.
| Account Data | Description |
|---|---|
| Account SID * | In the impact.com platform, from the top navigation bar, select [User profile] → Settings → API and copy the Account SID. |
| Auth Token * | In the impact.com platform, from the top navigation bar, select [User profile] → Settings → API and copy the Auth Token. |
| Program ID * | In the impact.com platform, select your brand name in the top-left corner of the impact.com app. Your Program ID is the numerical value under the program name. |
Step 3: Set up impact.com monitoring condition
In this step, you'll identify which conditions in Salesforce need to occur for impact.com to track it as a conversion event.
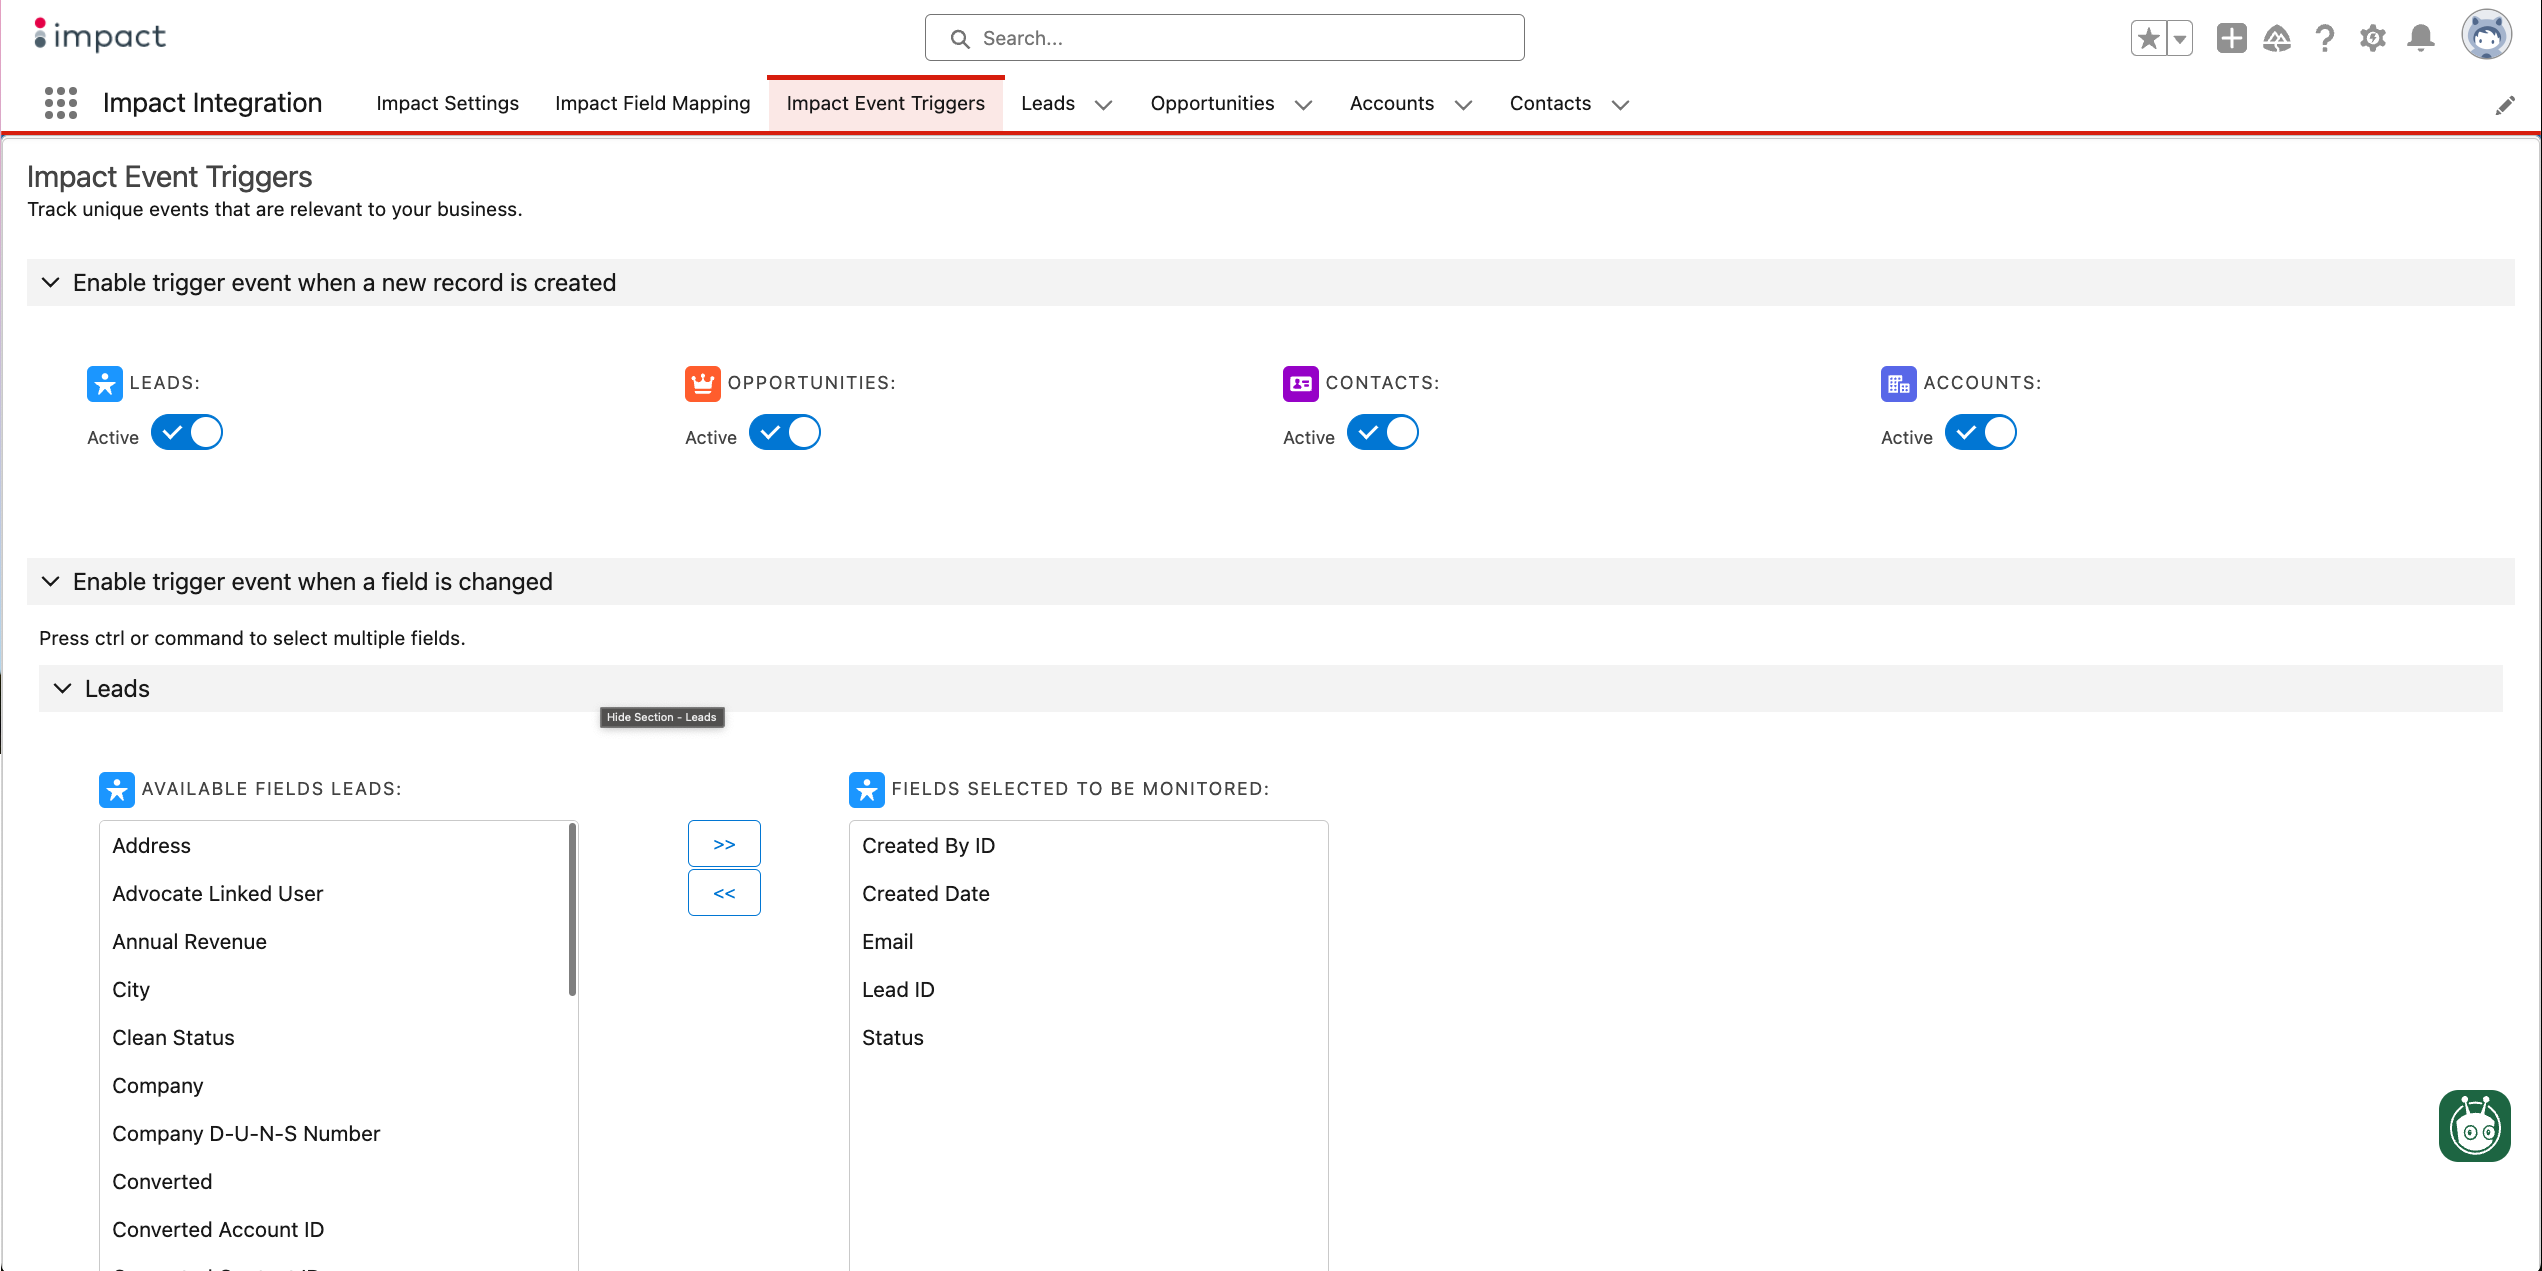
- In the Impact Integration app in Salesforce, select the Impact Event Triggers tab.
- Under the Enable sending events when records are created section, use the toggles to choose which events will trigger a conversion event in impact.com when a record is created in Salesforce for that object.
- Under the Enable sending events when records are updated section, use the toggles to choose which events will trigger a conversion event in impact.com when an object's record is updated in Salesforce.
Under the Record multiple field changed section, select the fields that you want a conversion event to occur for when they're updated.
The multiple field selections act as an
ORstatement — for example, ifLead StatusandLead Sourceare selected for an object, a conversion event is created whenever either field is modified.
Step 4: Configure Salesforce & impact.com data mappings
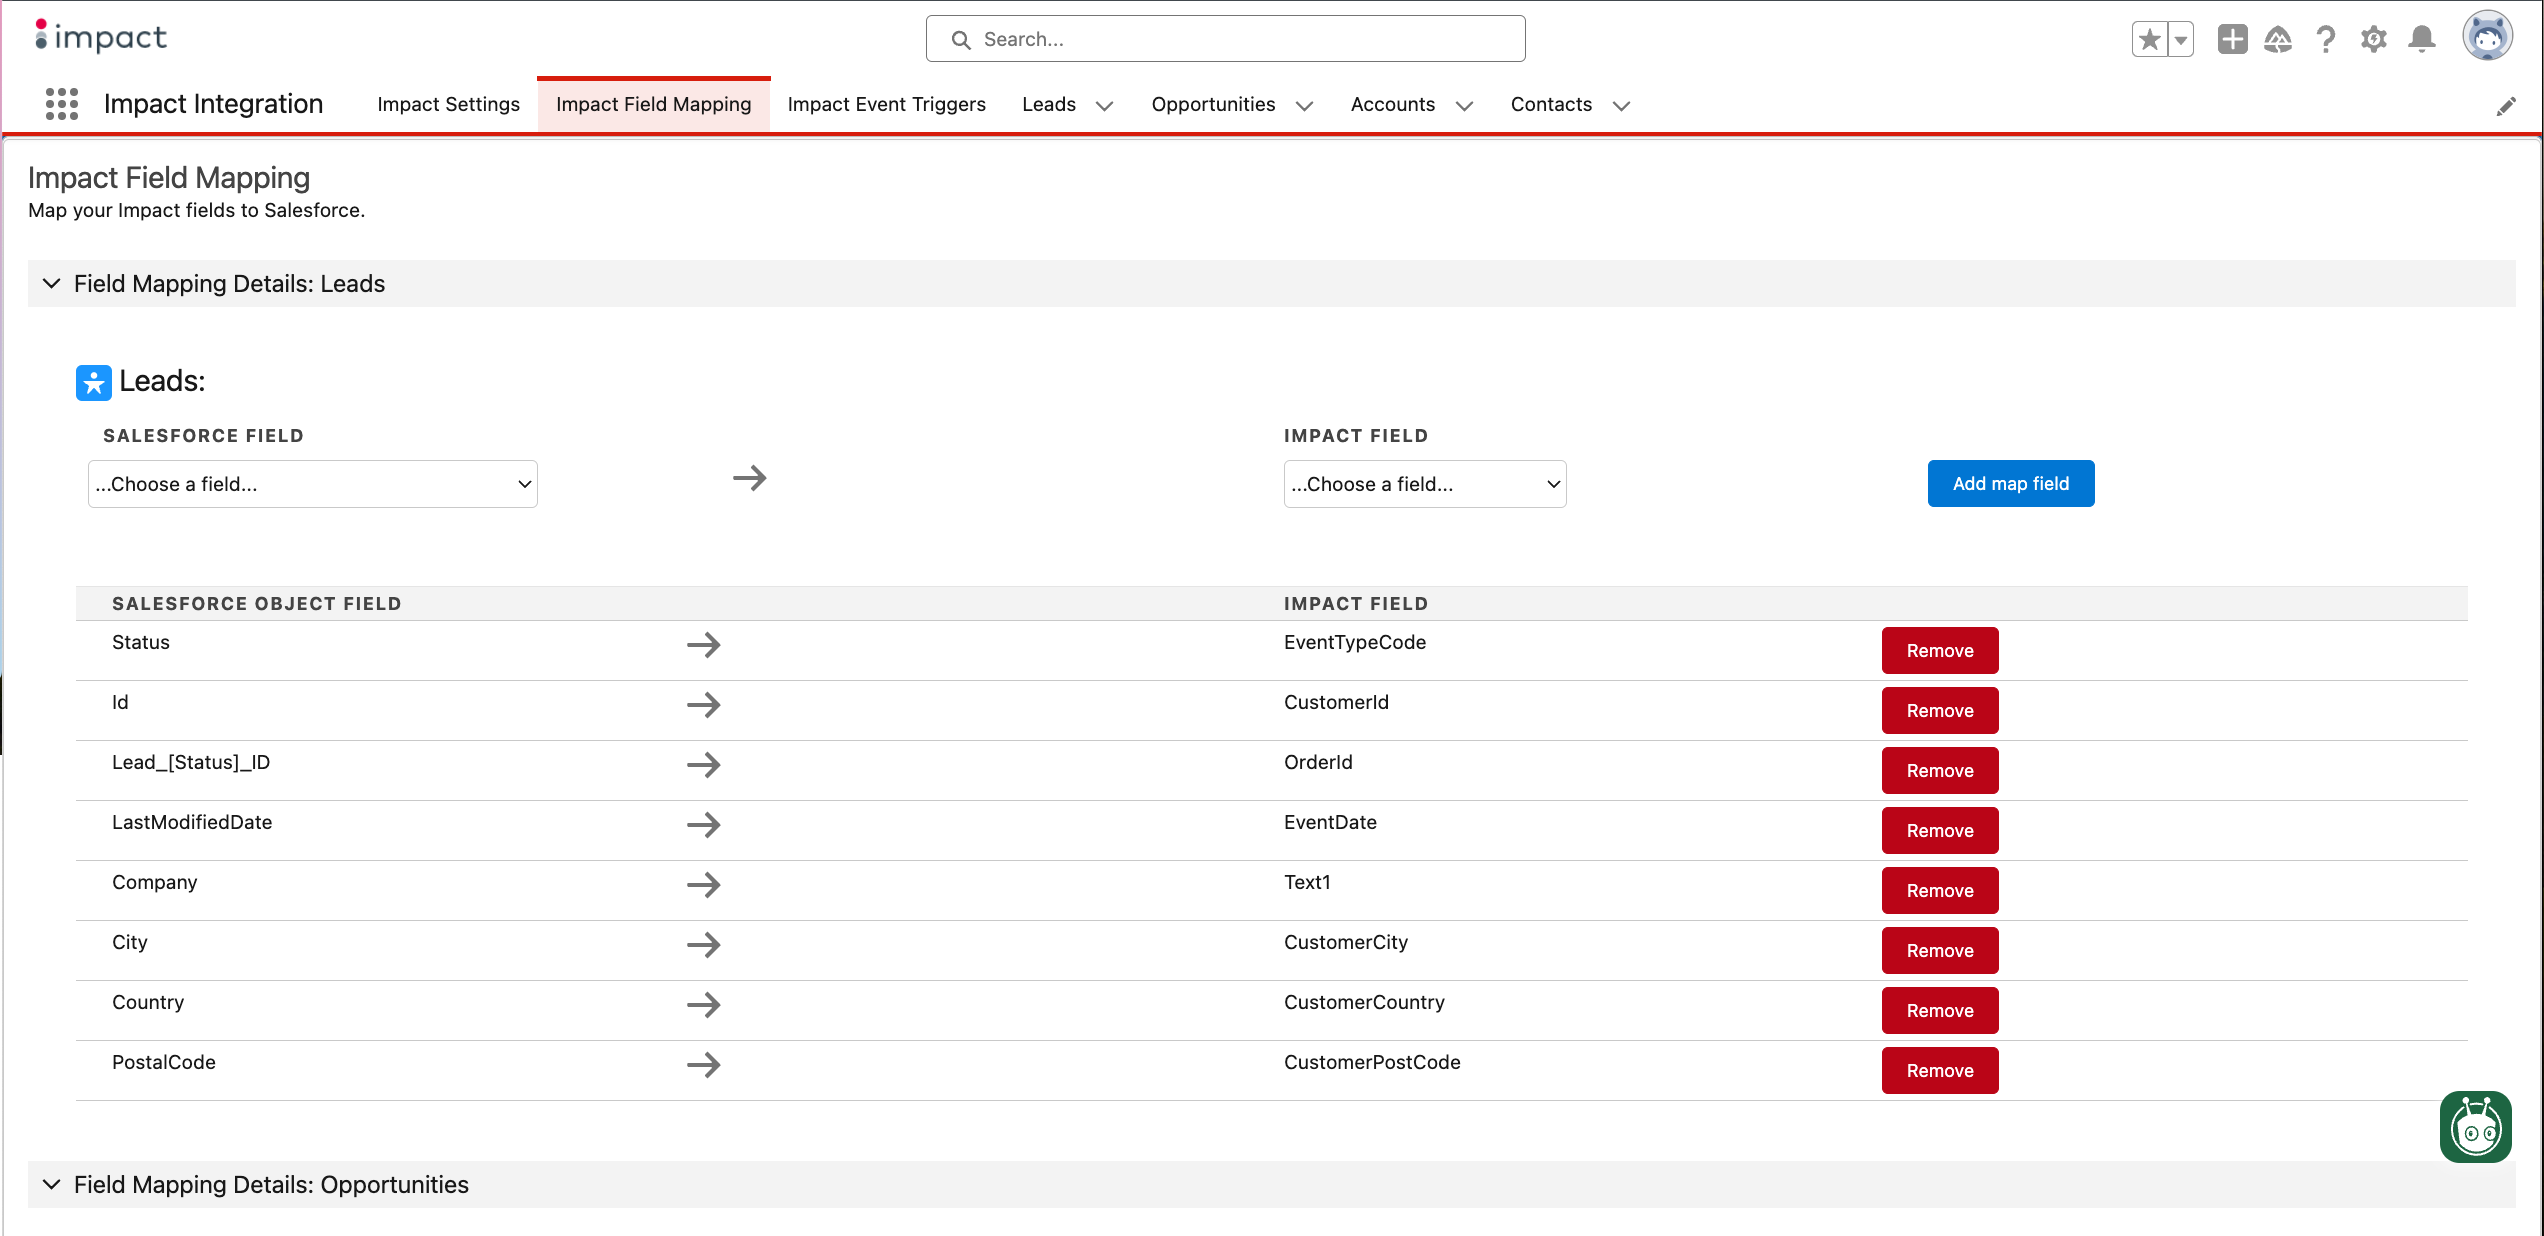
This step is where you'll configure a map of which Salesforce data parameters map to their equivalent impact.com data parameters. This step is key in ensuring the data you send from Salesforce is accurate for conversion reporting.
The instructions below apply to Lead, Opportunity, and Contact objects.
Add a mapping
When a Salesforce field is mapped to an impact.com field, the data in that field will be reported to impact.com in the conversion data.
- In the Impact Integration app in Salesforce, select the Impact Field Mapping tab.
- Refer to the Data mapping reference tables below for details.
- Under Salesforce Field, use the dropdown menu to select a Salesforce object field.
- Under the Impact Field, use the dropdown menu to select an impact.com data field.
- Select Add.
Remove a mapping
Removing a data mapping will no longer report that field to impact.com — be careful, as this can alter your conversion reporting.
- In the Impact Integration app in Salesforce, select the Impact Field Mapping tab.
Select the section (e.g., Leads, Opportunities, etc.) from which you want to remove a data mapping.
- In the list of existing data mappings, find the one you wish to delete and select Remove.
Test your integration
impact.com registers and tracks conversion events from Salesforce sandbox environments, allowing you to test your setup safely before moving to production. Your Salesforce sandbox environment is completely separate from your live Salesforce account, and anything you do here won’t affect your production data. Learn more.
Complete all the integration steps in your Salesforce sandbox environment.
Simulate a conversion that matches your trigger conditions, e.g., create a lead.
On impact.com, navigate to
[Engage] → Reports → More Reports, and confirm that the test action appears in your reporting.
Once you've verified that the integration is working correctly in your sandbox environment, you can replicate the setup in your Salesforce production environment.
Data mapping reference
Salesforce Lead
Replace $STATUS with the actual status value for the lead.
| Object Field | impact.com data field |
|---|---|
Lead_$STATUS | EventTypeCode |
ID | CustomerId |
Lead_$STATUS_ID | OrderId |
LastModifiedDate | EventDate |
Company | Text3 |
City | CustomerCity |
Country | CustomerCountry |
PostalCode | CustomerPostCode |
Salesforce Opportunity
Replace $STAGE with the actual stage value for the opportunity.
| Object Field | impact.com data field |
|---|---|
Opportunity_$STAGE | EventTypeCode |
ID | CustomerId |
Opportunity_$STAGE_ID | OrderId |
LastModifiedDate | EventDate |
CloseDate | Date3 |
Probability | Text2 |
Amount | OrderSubTotalPostDiscount |
Salesforce Products
| Object Field | impact.com data field |
|---|---|
Product_Name | ItemName1 |
Product_ProductCode | ItemSku1 |
Product_Quantity | ItemQuantity1 |
Product_UnitPrice | ItemPrice1 |
Product_Description | ItemCategory1 |
Product_TotalPrice | ItemSubTotal1 |
Salesforce Contact
Note: Contact object mapping is customizable and impact.com recommends that you map according to your use case. The table below is neither suggested nor required, but an example.
| Object Field | impact.com data field |
|---|---|
LeadSource | EventTypeCode |
Contact ID | CustomerId |
Contact_[Contact ID] | OrderId |
LastModifiedDate | EventDate |
Salesforce Account
| Object Field | impact.com data field |
|---|---|
Id | OrderId |
CreatedDate | EventDate |
Updated 18 days ago


