Integrate with Ecwid

Ecwid by Lightspeed is an ecommerce platform that helps small and medium-sized businesses to easily create a bold, easy-to-use online store and start selling online or in-person. The impact.com and Ecwid plugin app integrates impact.com ‘s conversion tracking and reporting with your Ecwid store. The integration is done via a no-code plugin, meaning you can integrate and end-to-end test without needing web development expertise.

⚠️

Integrating with Ecwid is still in beta. It currently requires:

⚠️

Understand the integration limitation:

Pre-integration checklist

This section covers the key settings in impact.com that you'll need to confirm before starting the integration process. For each item, make sure your account matches the specified setting.

Step 1: Event Type configuration

☑️

Online Sale Event Type

Confirm that your account has one (1) validated event type that tracks online sales.

  1. From the left navigation bar, select [
    (Menu) → Settings](https://app.impact.com/secure/advertiser/account-settings-flow.ihtml).
  2. In the right-side column, find the Tracking section and select Event Types.
  3. Confirm the following information is present for the event type you’ll use in this integration. If you don’t have this available already, reach out to your CSM (or contact support) to get a new event type created:
  • Type column reads Online Sale.
  • Status reads as Active.
  • Tracking reads as Web Services.
  • Promo Code reads as
    [Checkmark].

☑️

Tracking Method & Returns Processing

Confirm that the validated event type reports conversions and modifications/reversals (i.e., order & item returns) via API.

  1. From the left navigation bar, select
    (Menu) → Settings
    .
  2. In the right side column, find the Tracking section and select Event Types.
  3. On the Event Types screen, hover your cursor over the right-most column and select
    (More) → View/Edit.
  4. On the View/Edit Event Type screen, confirm that:
    • Tracking Method is configured to Non-Pixel Tracking (advanced) — Use system web service (API).
    • Returns Processing is configured to Automate returns processing (advanced) — Use system web service (API).

☑️

Customer Status Mapping

Confirm that impact.com can distinguish between new and existing customers in your store, which can be used to alter publisher payouts.

  1. From the left navigation bar, select
    (Menu) → Settings
    .
  2. In the right-side column, find the Tracking section and select Event Types.
  3. On the Event Types screen, hover your cursor over the right-most column and select
    (More) → View/Edit.
  4. On the View/Edit Event Type screen, select Show advanced settings.
  5. Next to the Customer Status Mapping line item, select
    (Edit)
    .
  6. Confirm that New Customer Value has the value New, and Existing Customer Value has the value Existing.
  7. Select Save.

Step 2: Gateway Tracking configuration

☑️

irclickid setup

Confirm that the campaign tracking template is configured exactly the same as the steps below, otherwise tracking will not work.

  1. From the left navigation menu, select
    (Menu) → Settings
    .
  2. In the right-side column, find the Tracking section, then select Gateway.
  3. Find the Campaign Tracking Template line item. Map irclickid to {clickid}.
  4. Select Save.

☑️

Deep Linking

Confirm that your website and store domain(s) can handle deep linking, which enables partners to link traffic directly to specific pages and products.

  1. From the left navigation menu, select
    (Menu) → Settings
    .
  2. In the right-side column, find the Tracking section, then select Gateway.
  3. Find the Deep Linking line item and configure the following domains under Permitted Domains, replacing example.com with your exact domains — do not use spaces between commas:
    example.com,example.myshopify.com,*.example.myshopify.com
  4. Select Save.

Step 3: General tracking configuration

☑️

Site Definition

Confirm that your website domain(s) are configured as site definitions, which enables impact.com’s tracking solution to forward traffic from the platform’s domains to yours.

  1. From the left navigation menu, select
    (Menu) → Settings
    .
  2. In the right-side column, find the Tracking section, then select General.
  3. Next to the Site Definition line item, confirm that your domains that you want tracked are specified as a comma-separated list (no spaces). For example, *.example.com,example.com tracks everything on your top domain and any subdomains, such as www.example.com or store.example.com.
  4. Select Save.

Add impact.com to Ecwid

This instruction set covers installing the impact.com app to your Ecwid store.

☑️

Install impact.com

  1. Access this link and select Get and then Install.

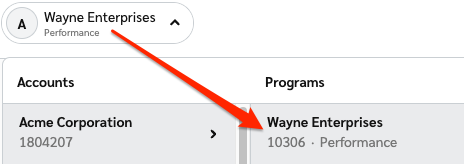
  2. On the impact.com Settings screen, fill in the relevant account data. Refer to your account data below to easily retrieve this information.

    Account DataDescription
    Impact Account SID*Navigate to
    → Settings → API to find your Account SID. Copy the full case-sensitive value.
    Auth Token*Navigate to
    → Settings → API to find your Auth Token. Copy the full case-sensitive value
    Program ID*Enter your Program ID value (a.k.a Campaign ID value). To find this value, select your brand name in the top left corner of impact.com. Your Program ID is shown in gray type under your Program name in the Program column.
    Event Type ID*Navigate to
    → Settings → Event Types
    . Your Event Type ID is the number in parenthesis next to the name of the event type — enter this value.
    Universal Tracking Tag (UTT)[Optional] Navigate to
    → Settings → General
    . Paste your entire unique UTT code into this field.
  3. Select Save. You'll receive confirmation that impact.com has been installed to your Ecwid store, after which you can begin end-to-end testing.

End-to-End Testing

Once the impact.com app is fully installed, you can begin end-to-end testing to ensure everything is working properly. Learn how to proceed with End-to-End Testing.

Troubleshooting

My test conversion isn't appearing in impact.com

If your test conversion isn't appearing, check the following:

  • You've waited at least 30 minutes since the test conversion occurred in your Ecwid store. Conversion reporting can take up to 2-4 hours during peak times — consider checking back later in a few hours.
  • Your Event Type ID in Ecwid exactly matches the Event Type ID in impact.com.
  • Use the OrderId (OID) Lookup tool to search for the Ecwid Order ID of the test order.