Integrate with Recurly
Note: Integrating with Recurly is in betaOur impact.com integration with Recurly is currently in beta. Should your experience not match the guide below, please reach out to your CSM (or contact support).
Recurly is a subscription and billing platform that allows you to easily process recurring payments. B2B brands often run Performance programs to drive new subscription sign-ups and reward partners based on recurring payments from the sign-ups. The impact.com Recurly integration allows you to track those subscription sign-ups and reward your partners for them.
Understand the integration limitations
impact.com only supports tracking Subscription events on Recurly.
The integration is also able to differentiate the first and recurring subscription events, but cannot differentiate between the recurring events. For example, the integration cannot differentiate between the second recurring billing and the fifth recurring billing.
How it works
- On your website (or store), you'll implement a script that captures an impact.com Click ID (
im_ref) value from the user's browser, then add it as a metadata property to the Recurly subscription record. - You'll then generate read-only Recurly API credentials for impact.com to use.
- You'll create a custom field (
impact_click_id) for Subscriptions. - You'll provide Recurly API credentials for impact.com via our partner integration portal, which will generate an Execution URL that you'll use to configure a webhook in Recurly.
- Once authenticated, the integration uses Event Webhooks to capture
successful_refund,successful_payment, andvoid_paymentevents from Recurly and send them to your impact.com account
Check before integrating
Before proceeding with the Recurly integration, ensure you have:
- Access to your impact.com account
- Admin access to your Recurly account
- Your impact.com account credentials ready
- A Performance program set up in impact.com
Recurly Setup
Before we can integrate impact.com with Recurly, you'll need to complete these two steps in your Recurly account.
Step 1: Generate a Recurly API key
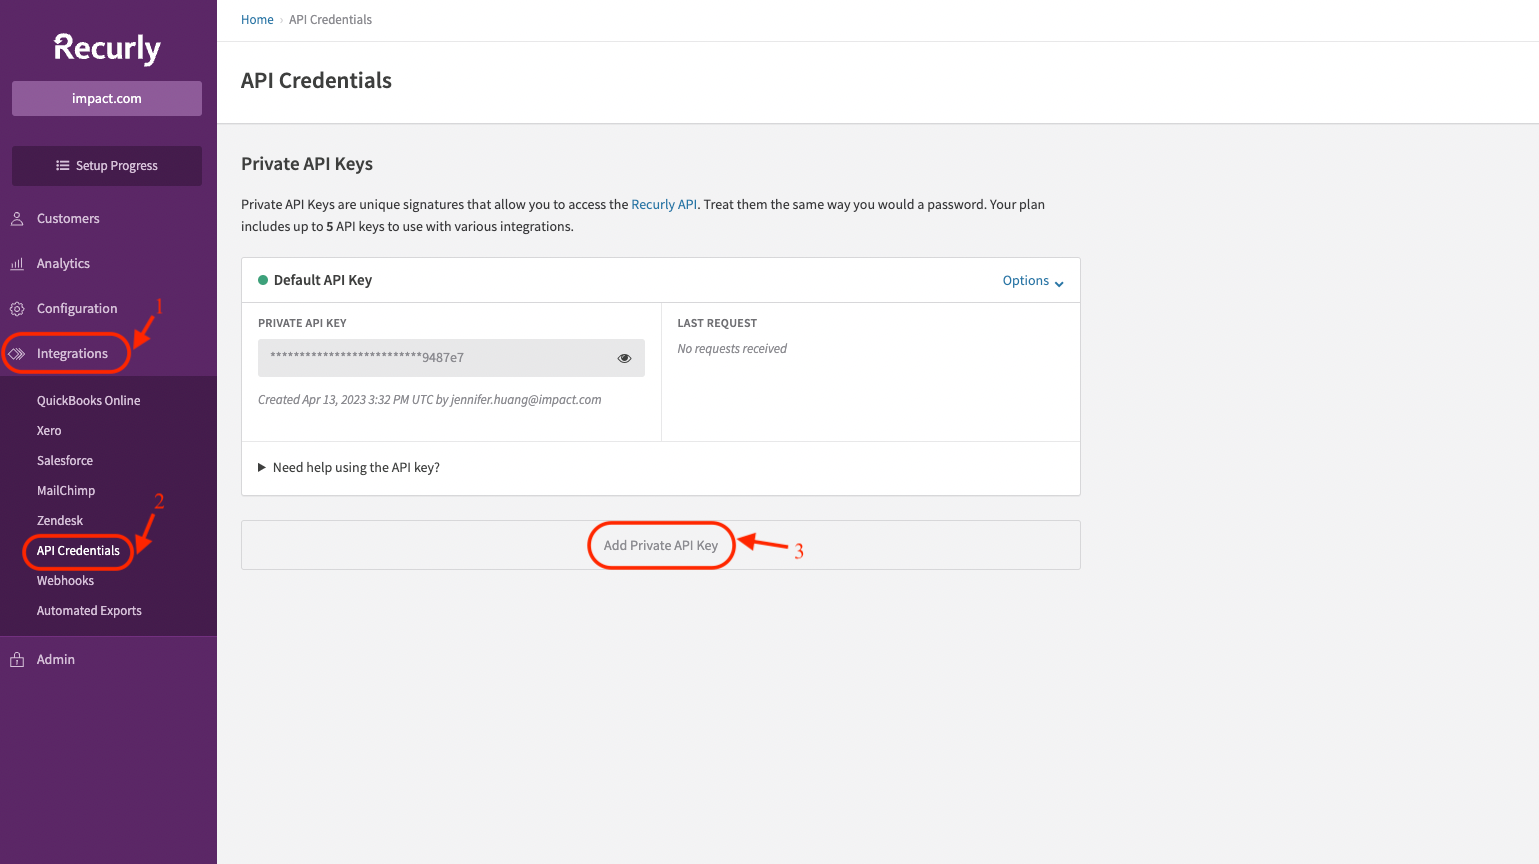
You will need to generate a private API key for impact.com to access the necessary data layer.
-
Navigate to your Recurly Dashboard, and from the left navigation bar, select Integrations.
-
Select API Credentials.
-
Select Add Private API Key.
-
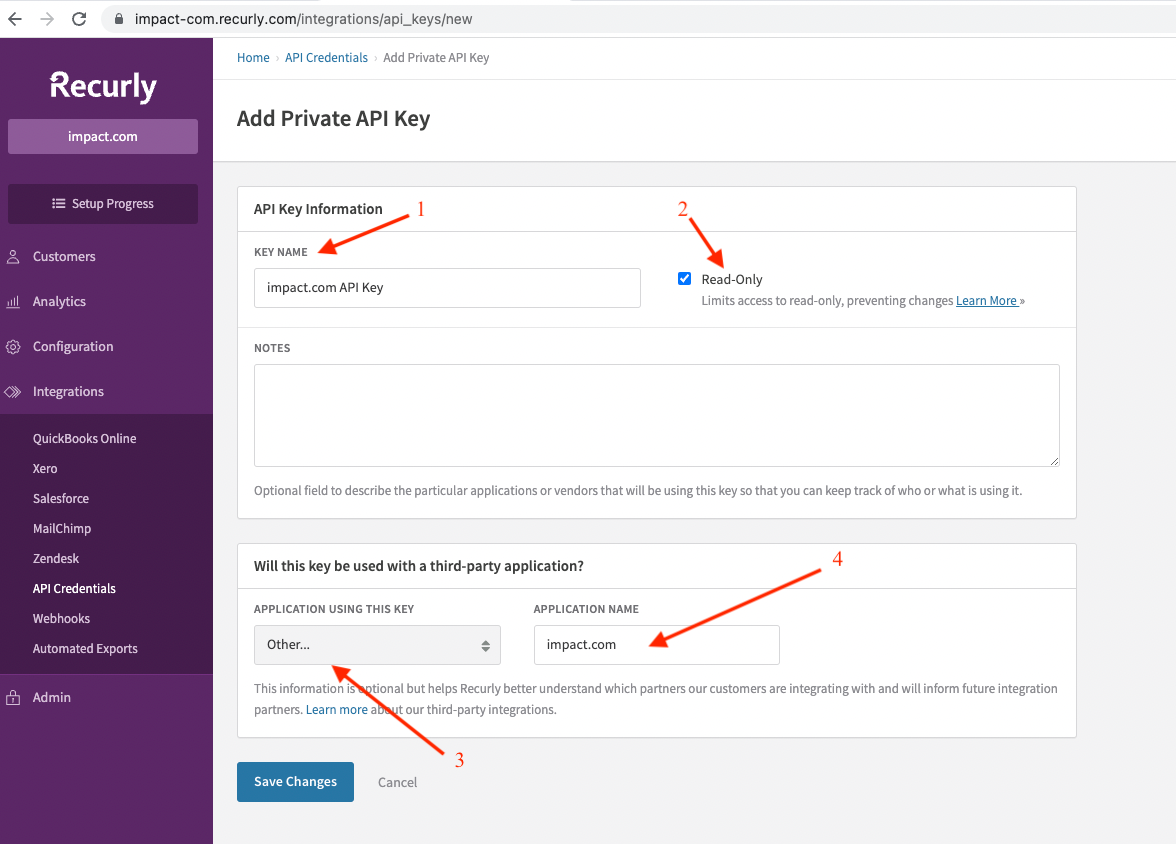
Fill in the API Key Information.
- Add a meaningful (1) Key Name.
- Select (2) Read-Only.
- For the (3) Application Using this Key field, select Other.
- Enter (4) impact.com as the Application Name.
-
Select Save Changes.
Step 2: Create a custom field
Create a custom field in Recurly for Subscriptions.
-
Navigate to your Recurly Dashboard, and from the left navigation bar, select Configuration.
-
Select Custom Fields.
-
Select Create Your First Custom Field or Create Custom Field if you already have existing custom fields.
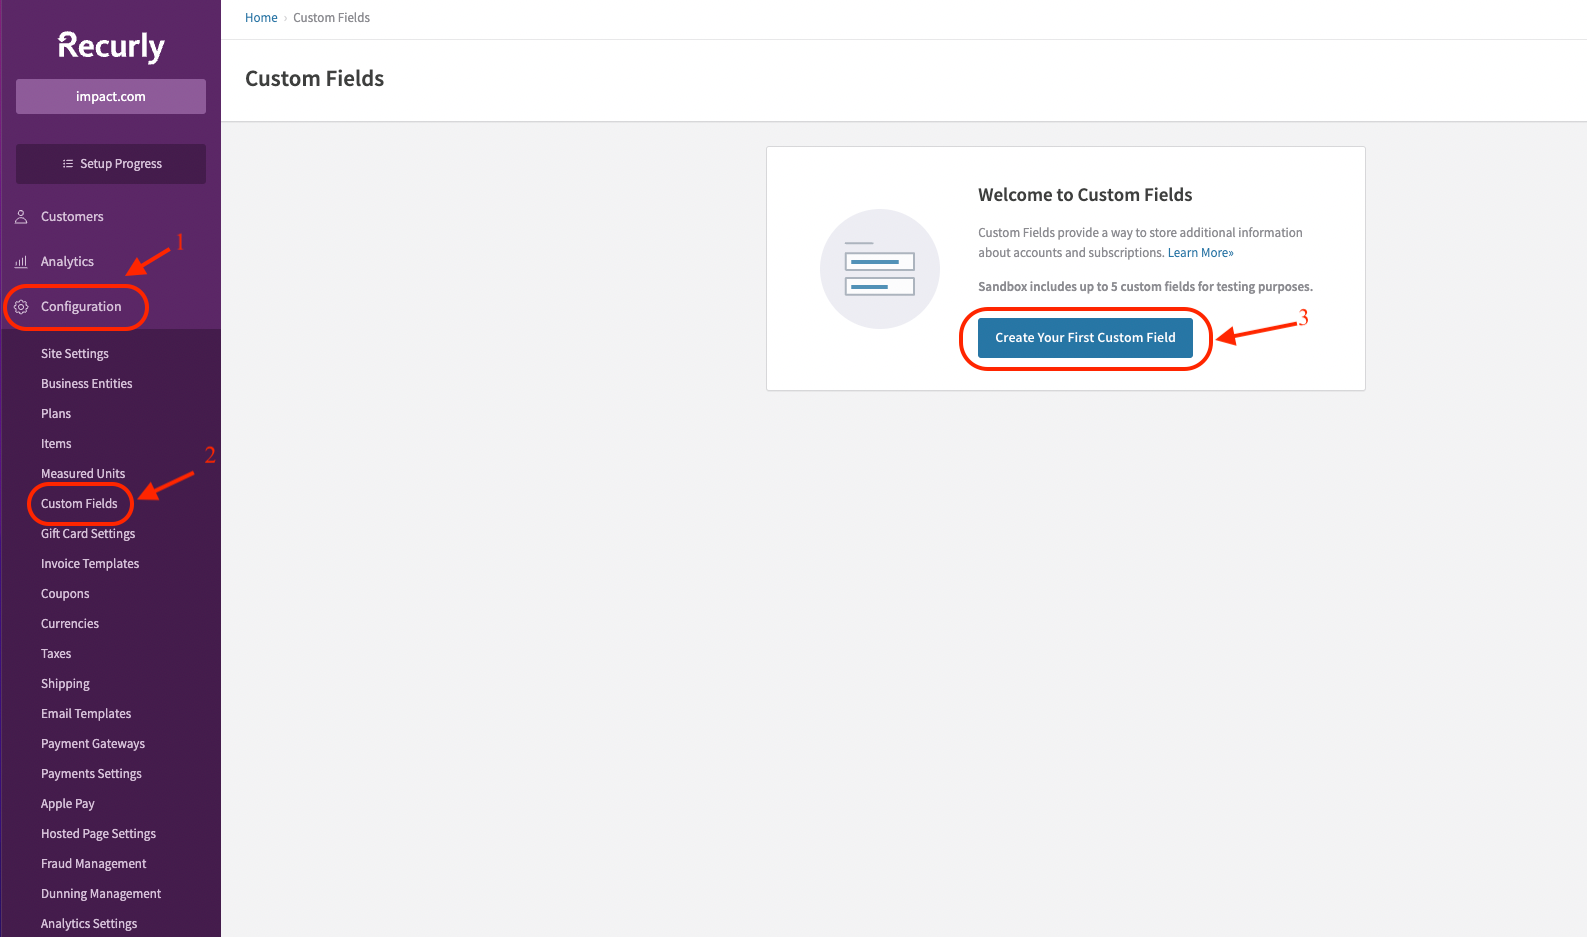
-
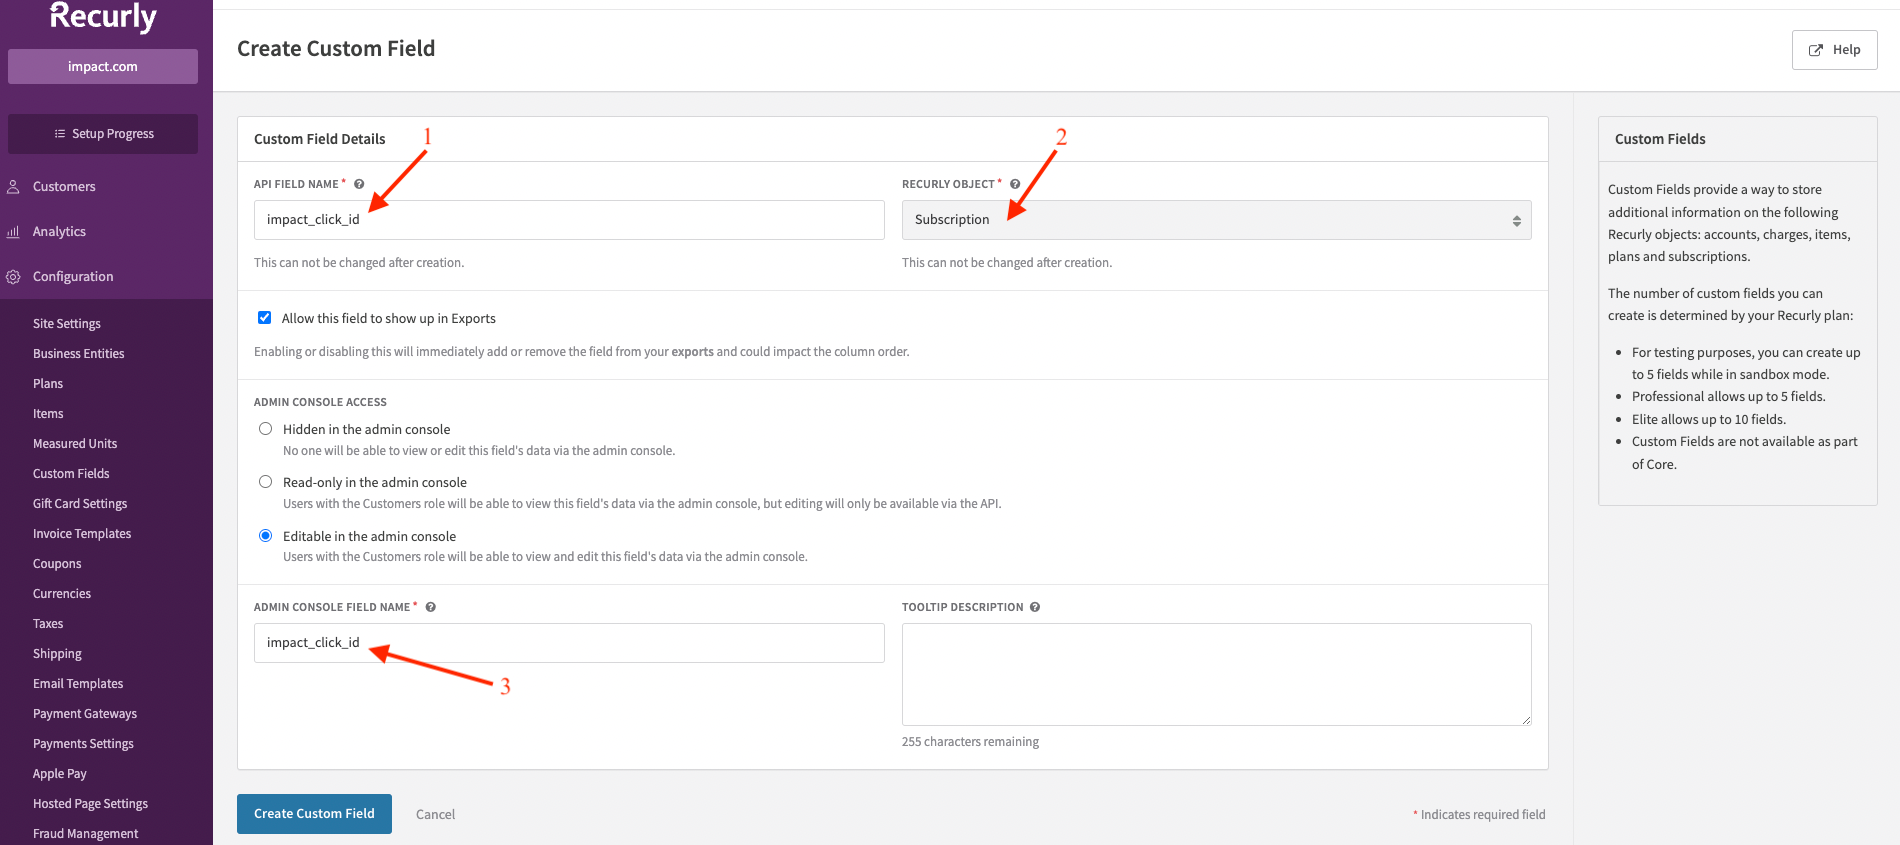
Fill in the Custom Field Details.
- In the API Field Name (1) field, enter
impact_click_id. - For the Recurly Object (2), select Subscription.
- For the (3) Admin Console Field Name field, enter
impact_click_id.
- In the API Field Name (1) field, enter
-
Select Create Custom Field.
impact.com Integration Setup
Step 1: Configure the Recurly Integration
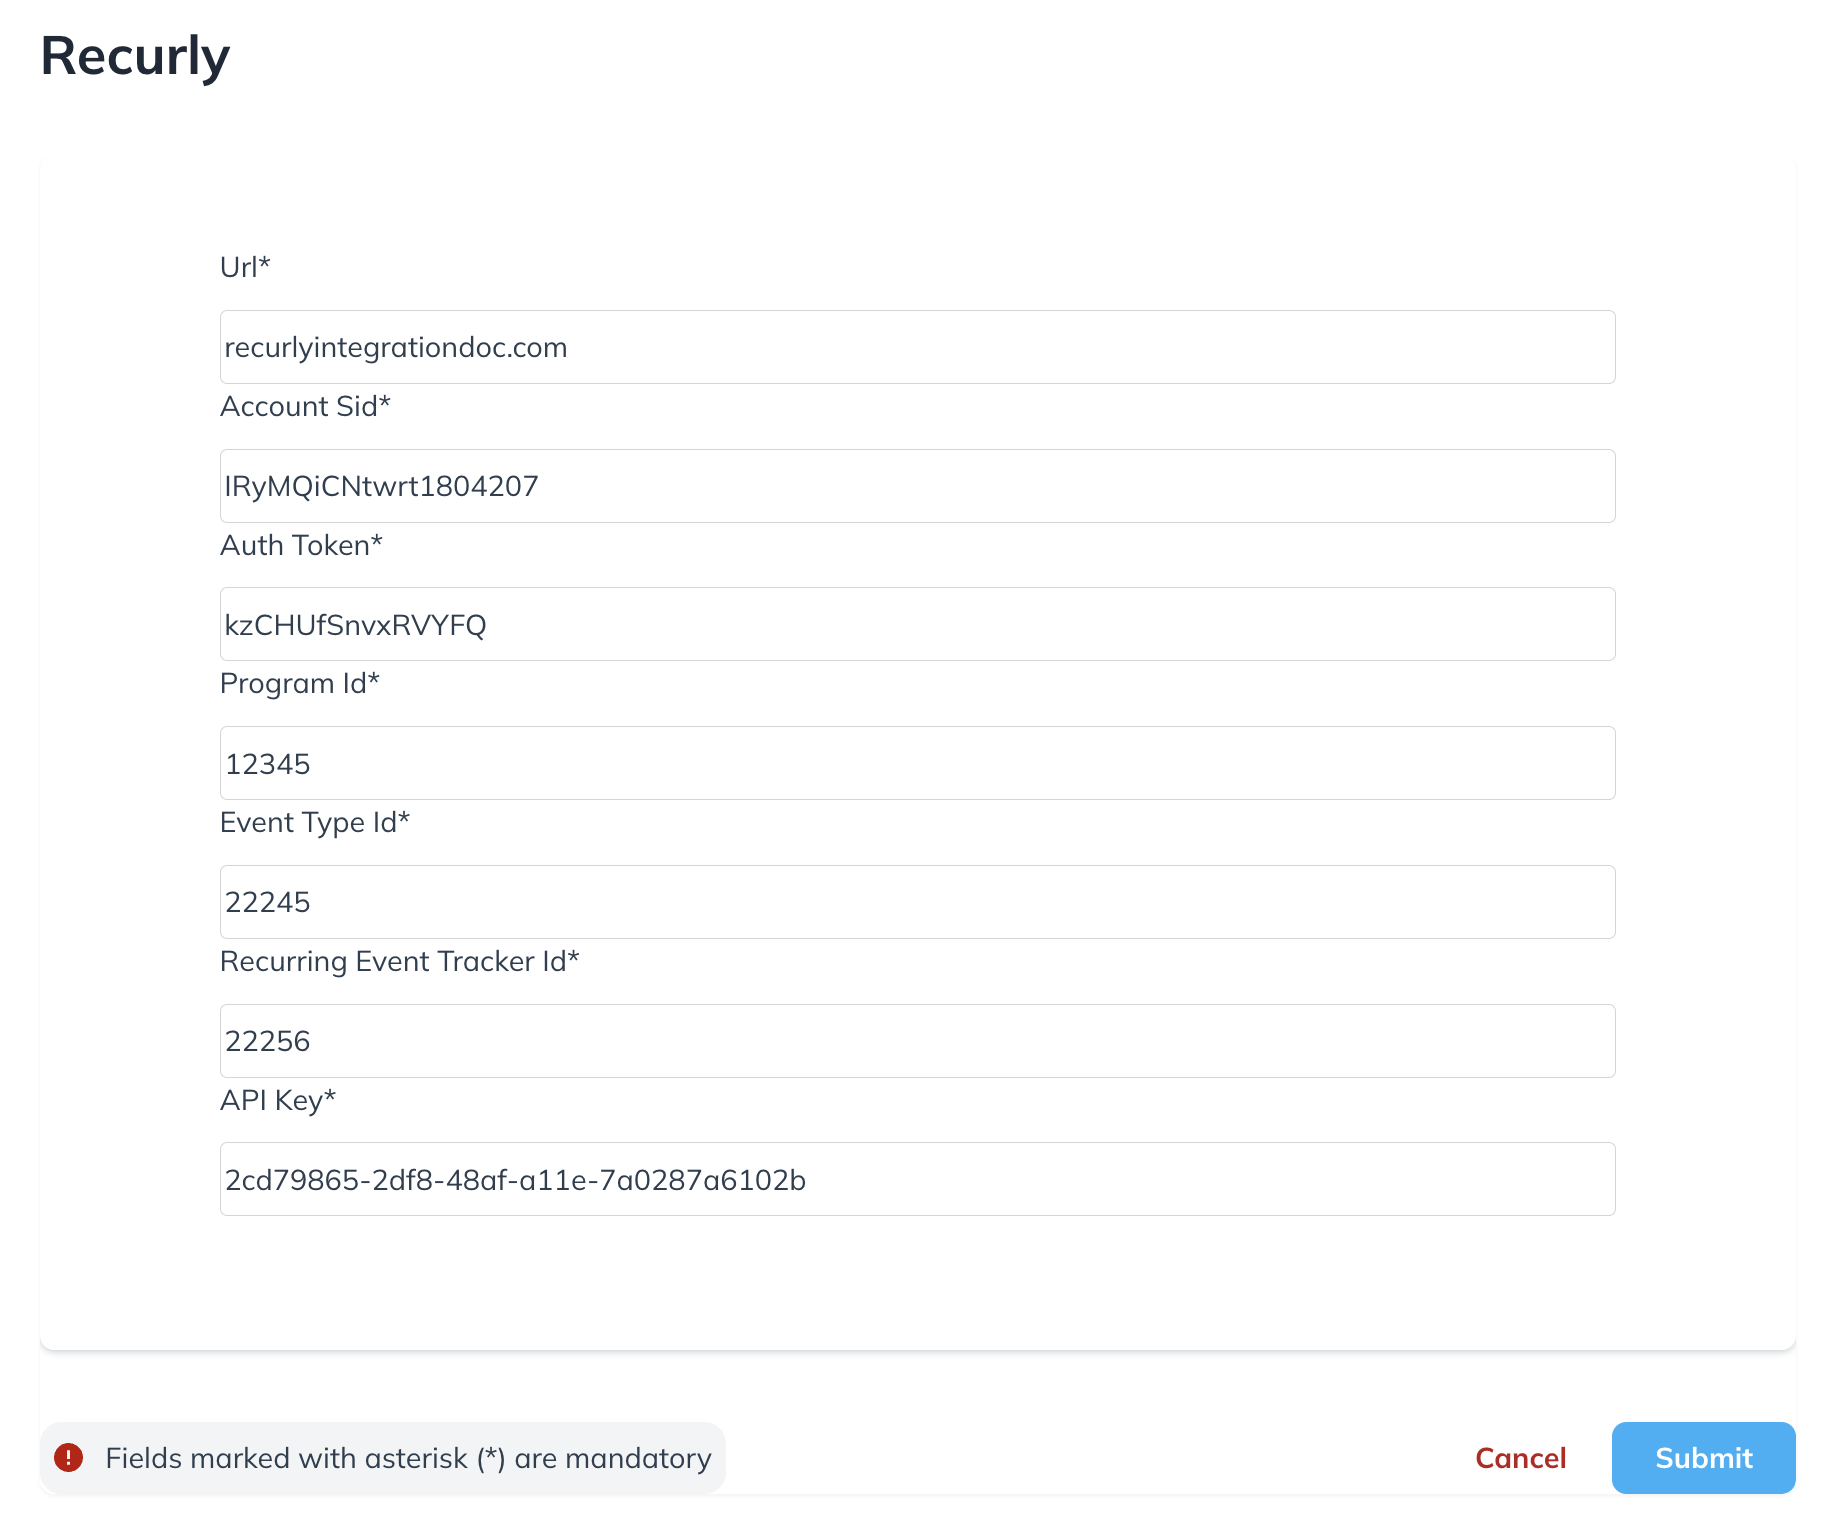
- Navigate to the impact.com payments integration platform, and select Recurly.
- Log in with your impact.com Account SID and Auth Token as credentials.
- See the Account info cheat sheet table below to learn how to access these credentials.
- In the Recurly integration form, add your account information, including the API Key you created in Recurly above.
- See the Account info cheat sheet table below to learn how to access these credentials.
- Select Submit. The form will populate the Execution Url field. Take note of this URL, we'll need it for the next step.
impact.com Account Info Cheat Sheet
Not sure what your account info is? Refer to the table below:
| Field | Description |
|---|---|
| Impact Account SID * | In the impact.com platform, from the top navigation bar, select [User profile] → Settings → API and copy your Account SID. |
| Auth Token * | In the impact.com platform, from the top navigation bar, select [User profile] → Settings → API and copy your Auth Token. |
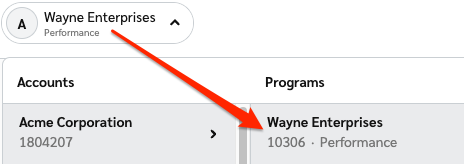
| Program ID * | In the impact.com platform, select your brand name in the top-left corner. Your Program ID is the numerical value under the program name. |
| Event Type ID * | In the impact.com platform, from the top navigation bar, select [User profile] → Settings → Event Types. Copy the number in parenthesis next to the name of the event type. |
| Recurring Tracker ID* | In the impact.com platform, navigate to your Event Types. This event type must be linked as a child event to your first subscription event type. For help with creating and linking event types, contact support. |
Step 2: Configure Recurly webhook
-
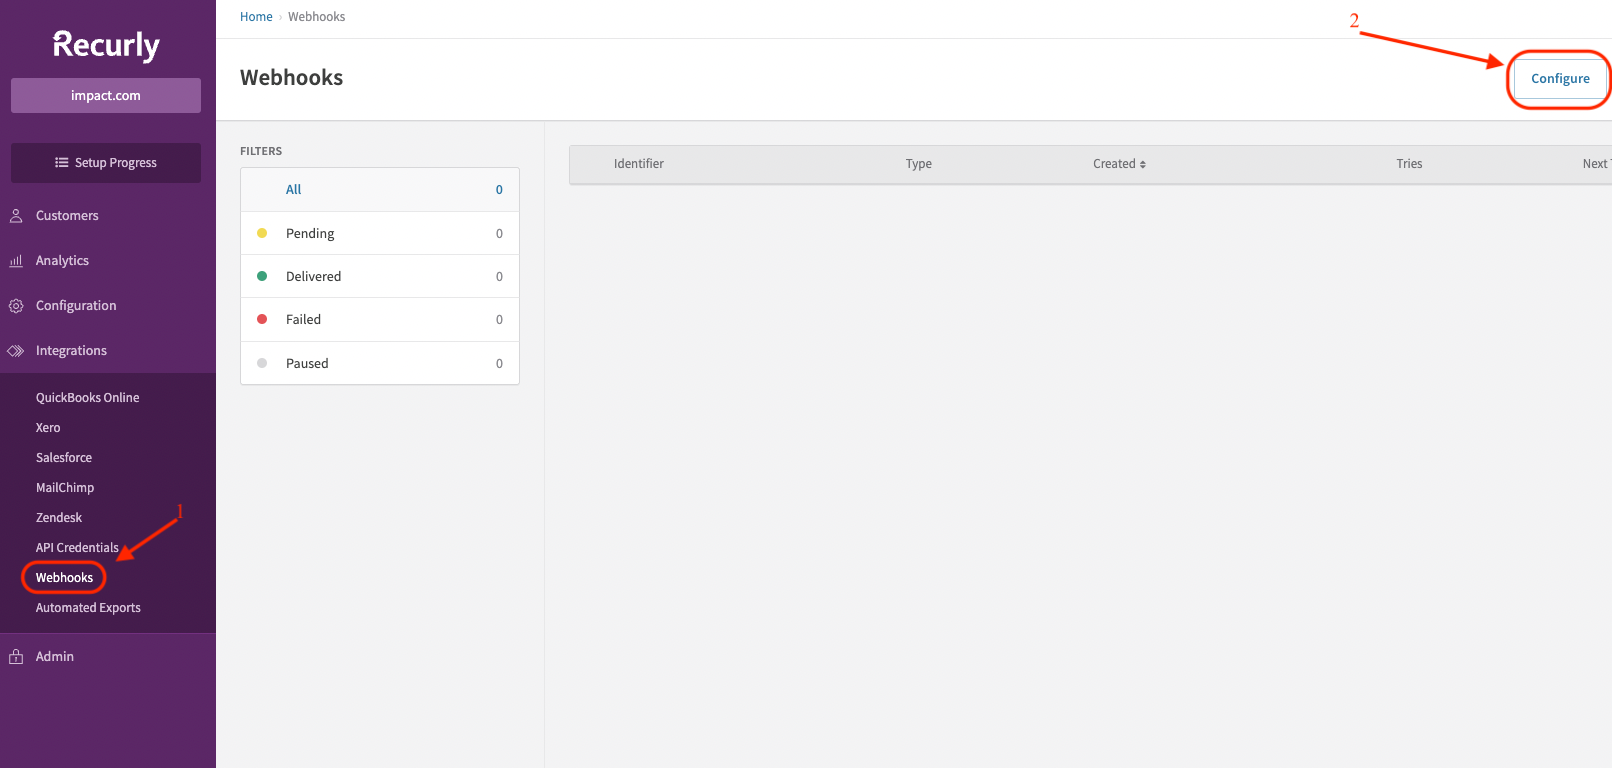
In Recurly, navigate to Integrations → Webhooks
-
Select Configure.
-
Select New Endpoint.
-
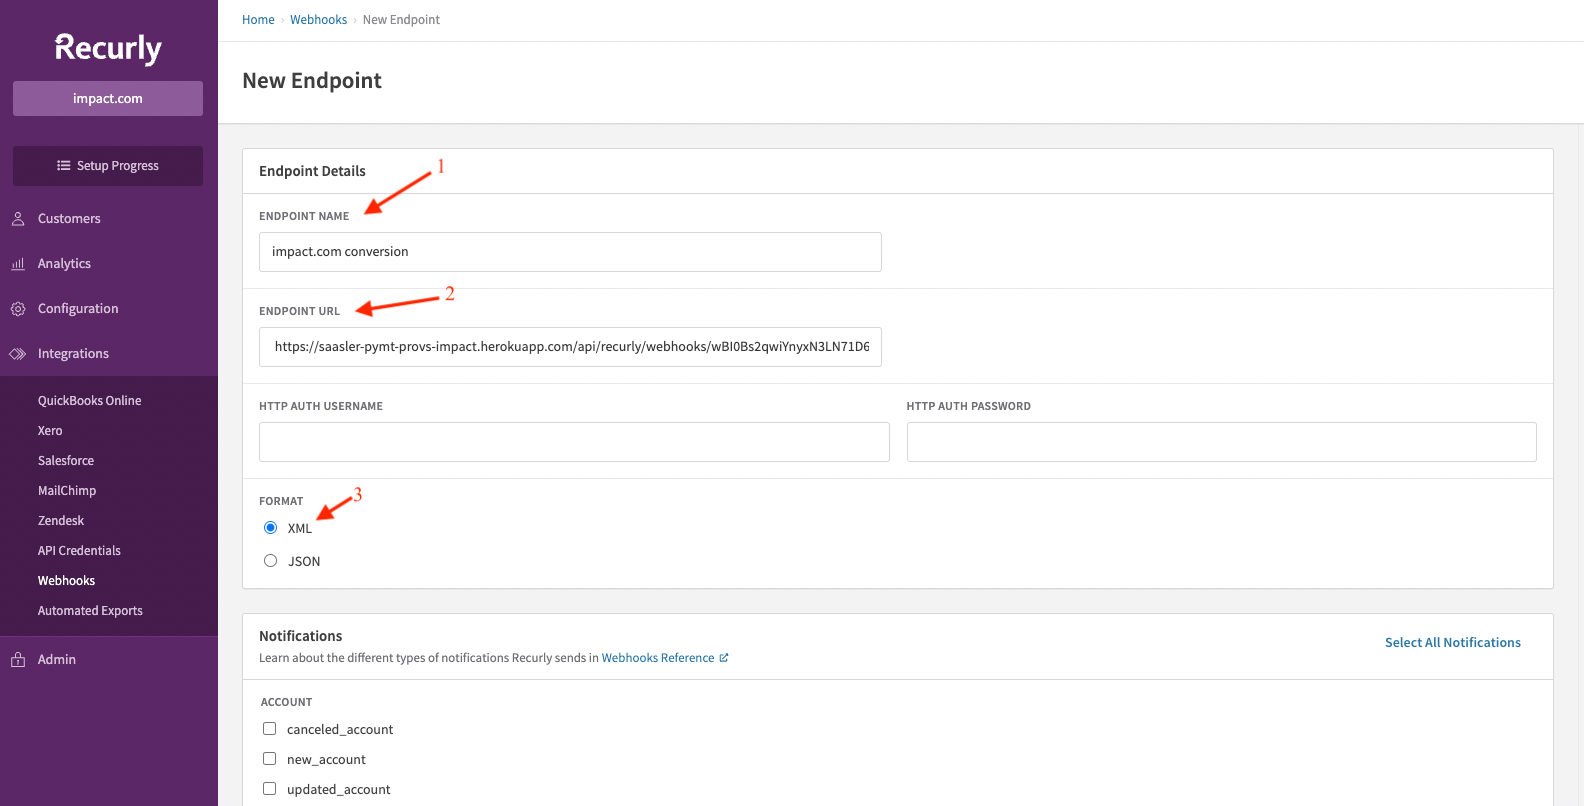
Fill in the endpoint details.
- (1) Endpoint Name — enter a meaningful name of choice.
- (2) Endpoint URL, copy and paste the Execution Url from the step above.
- (3) Select XML as the format.
-
For notifications, select the following 3 events:
successful_refund,successful_payment, andvoid_payment.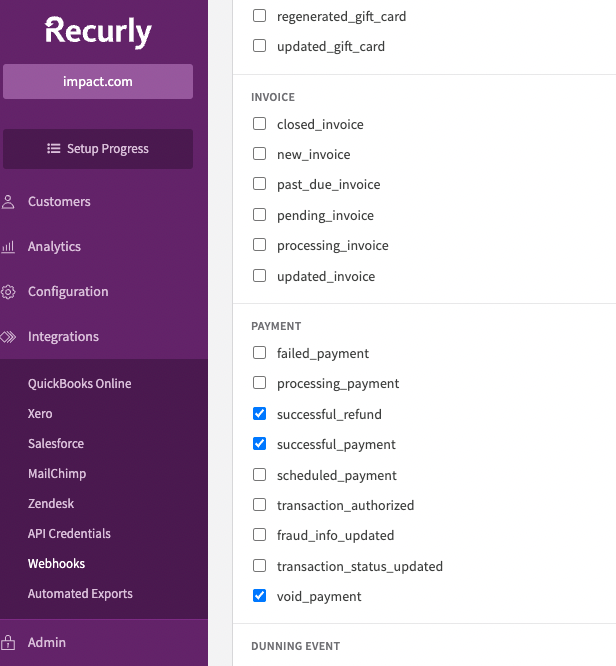
Step 3: Capture the Click ID and send it to Recurly
Suggested InstructionsStep 3 below is just a recommended method to get the
clickIDvalue into Recurly.Feel free to implement an alternative approach that best fits your business needs.
1. Implement UTT
impact.com needs to generate and capture clickID values for visitors to your store, a simple way to do this is to implement impact.com's UTT in your store. The UTT provides a series of functionality that would ease you into capturing and handling the clickID. To capture the ClickId, you must obtain your account’s UTT script from impact.com’s platform and set it up to load on every public page of your site. Follow the steps below to access your account UTT.
-
In impact.com, from the top navigation bar, select [User profile] → Settings.
-
Select General under the Tracking section.

2. Capture the im_ref and add it to the payment form
im_ref and add it to the payment formThe UTT provides the generateClickId function that you can use to fetch the im_ref value required to be able to track conversions. Copy the full script tag below into your clipboard.
ire(‘generateClickId’, callback);- Callback: Receives the captured
clickIdas a parameter and you can freely manipulate it to include it in Recurly's subscription payment form. You can then send this information to your backend for later processing.
The example below indicates how you could capture the im_ref using the UTT generateClickId function and set the value in a hidden field of a form on a field with id impact_click_id using jQuery.
ire(‘generateClickId’, function (clickid) {
  $(‘#impact_click_id’).val(clickid);
});
3. Add the im_ref value to the custom field (impact_click_id) when subscriptions are created
im_ref value to the custom field (impact_click_id) when subscriptions are createdWhen the subscription creation is being processed on your application backend, you can include the im_ref, captured in the previous step, in the custom_fields field of the subscription body before calling the Recurly API.
# javascript
try {
  let subscriptionReq = {
    planCode: planCode,
    currency: ‘USD’,
    account: {
      code: accountCode
    },
    custom_fields: [
      {
        name: ‘impact_click_id’,
        value: impact_click_id
      }
    ]
  };
  let sub = await client.createSubscription(subscriptionRed);
  console.log(‘Created subscription: ‘, sub.uuid);
} catch (err) {
   // ...
}
Updated 15 days ago

